Using CapCut for Video Editing
In today’s fast-paced digital landscape, creating standout video content is more important than ever. Whether you’re a vlogger, a marketer, or simply someone passionate about video creation, having robust and intuitive video editing software is essential. CapCut Desktop is the all-in-one video editing software designed to help you transform your videos with ease and creativity.
Why CapCut Desktop Stands Out
CapCut Desktop is not just any video editing software; it’s a comprehensive creative platform infused with advanced AI technology. Whether you’re looking to enhance personal projects or elevate professional content creation, CapCut Desktop empowers you to unleash your creativity and achieve impressive results effortlessly. Download CapCut Desktop today and experience the difference in your video editing endeavors.
Here’s why you should consider downloading CapCut Desktop:
Key Features of CapCut Desktop:
- Basic Video Editing Features: CapCut offers all the essential tools you need, including cropping, trimming, flipping, rotating, mirroring, splitting, reversing, resizing, adjusting scale and position, color adjustment, blending, and adding text, overlays, captions, filters, and effects.
- Advanced Video Editing Features:
- Speed Curve: This feature allows for smooth transitions between different speeds, enhancing the flow and impact of your video sequences.
- Keyframe Animation: By setting keyframes at specific points in your timeline, you can control aspects like position, scale, opacity, and more, achieving customized and dynamic visual enhancements.
- Masking: Whether you’re blending scenes, highlighting specific elements, or creating visual overlays, Masking provides precise control over where effects and adjustments are applied within your video.
- Transcript-Based Editing: Simplify the editing process with Transcript-Based Editing, which allows you to edit your videos using transcripts.
- Split Scene: Streamline your editing workflow by seamlessly splitting scenes with the Split Scene feature. This tool enables you to divide video clips effortlessly, making it easier to rearrange segments, remove unwanted content, or create precise cuts for enhanced storytelling.
- AI Tools:
- Built-in AI Tools: Enhance your videos with features like Relight, Smooth Slow-Mo, and Retouch.
- AI-Generated Tools: Add AI-generated stickers and text to your videos for a unique touch.
- Audio Editing Tools:
- Adjust audio volume, pitch, and playback speed.
- Apply fade-in/out effects, trim, split, remix, and separate audio.
- Use features like transcript-based editing, voice over, noise reduction, loudness normalization, voice changer, voice enhancement, and vocal isolation.
- Vast Media Resources:
- Access a comprehensive library of video templates, stock music, sound effects, effects, transitions, filters, and animations to elevate your projects.
- Wide Support for Various Formats:
- Import and export a wide range of audio and video formats, ensuring compatibility with different media sources and platforms.
Steps to Get Started with CapCut Desktop
Ready to explore the amazing capabilities of CapCut Desktop? Here’s a quick guide to help you get started:
Step 1: Import Your Media
Launch CapCut Desktop and start a new project. Import your media files by either dragging and dropping them into the project window or browsing your computer’s storage. Shortcut tip: Use Ctrl+I (Windows) or Cmd+I (Mac) for faster importing.
Step 2: Start Your Creative Journey!
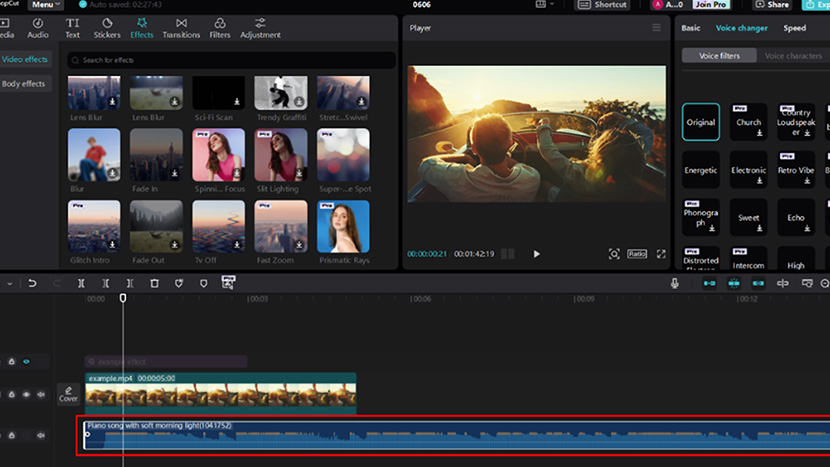
Transforming your audio is simple with CapCut’s voice changer. Here’s how:
- Select Your Clip: Click on the audio clip in the timeline.
- Edit Audio: On the right-side panel, find and click the “Voice changer” button. You shall find diverse settings and sound effects that represent specific moods.
- Apply Voice Changer: Choose from various voice effects like chipmunk, monster growl, or robot voice to add a new dimension to your video. Easily apply the voice filter or voice character and adjust the strength.
Other than changing the hearing element, enhancing your visuals is also important. With CapCut’s video editing software, adding video effects is surprisingly straightforward:
- Select Your Clip: Choose the video clip in the timeline.
- Open Effects Panel: Click the “Effects” button in the editing options on the left side.
- Explore Effects: Explore a treasure trove of effects, all neatly organized into categories to fit your video’s mood. Start strong and finish with flair using flashy “Opening & Closing” effects – think fancy decorations that grab attention. Want a party vibe? Pick effects from the “Nightclub” category for flashing lights and energetic vibes. Feeling fancy? Use the “Lens” category to add special effects that make your video look like a professional movie, like adding a touch of movie-star sparkle to your project!
- Apply and Customize: Click on an effect to preview and adjust its intensity. You can layer multiple effects for a more complex look.
Step 3: Export and Share
Once you’re satisfied with your edits, click the “Export” button. Customize your export settings to ensure your video meets the requirements of your chosen platform, whether it’s YouTube, TikTok, or another site.
Why You Should Download CapCut Desktop Today
CapCut Desktop is more than just video editing software; it’s a comprehensive platform that empowers you to bring your creative vision to life. With its user-friendly interface, powerful features, and extensive media resources, CapCut Desktop makes video editing accessible and enjoyable for everyone.
Don’t miss out on the opportunity to transform your videos into engaging and professional-looking content. Download CapCut Desktop today and start creating videos that will captivate and inspire your audience. Whether you’re looking to add a hilarious voice changer effect, experiment with stunning video effects, or simply create polished and dynamic videos, CapCut Desktop has everything you need to elevate your video editing game.


