Underwater Filmmaking Basics
How to Shoot Underwater Video
Jacques Cousteau produced some of the world’s greatest underwater videos. These videos inspired thousands of deep-sea explorers and avid wildlife filmmakers, including Untamed Science. As a result of his work, many people saw for the first time new species of flora and fauna, famous historical shipwrecks, and unexplored underwater caves. Thus, Cousteau’s films gave underwater filmmaking greater prestige and attention. Now the world relies on underwater videographers to share this uncharted environment with the rest of the world.
Not all of us can become Jacques Cousteau, but preparation and hard work can make you an exceptional underwater filmmaker. Here, we introduce some of the key elements you must consider before beginning your underwater adventures. From learning how to SCUBA to adjusting for light and color, this guide will wade through the basics of underwater filmmaking.
Preparation
Learn to Dive
Becoming a certified SCUBA diver is perhaps the most obvious requirement for underwater filmmaking. Filmmakers often bypass the bulky SCUBA equipment when taking video of large animals such as whales, but you’ll need to learn the basics of SCUBA diving to take your skills to the next level. Understanding how to dive properly will allow you to get close to coral without damaging it or capture footage of wild marine life without endangering yourself. It will also help you learn to keep a camera steady while the animals perform their behaviors.
In addition to SCUBA training, we also recommend that you learn to free-dive. The disadvantage of traditional SCUBA is that you often scare large fish and marine mammals with bubbles. Free-diving allows you to swim freely with these creatures. But be safe; always practice free-diving with a buddy around.
Rebreathers
If you don’t want to make bubbles but you need to stay down for extended periods, you can use closed circuit rebreathers, self-contained dive units that recycle the air we breathe so as not to release any bubbles. A rebreather adds oxygen to the system and filters out carbon dioxide. These systems generally allow a diver to stay underwater for a long time.
Know the Underwater Environment
When shooting video underwater, you want to make sure you don’t break or damage anything in proximity. This may sound obvious, but it can be a bit difficult maintaining your focus on your subject while making sure you are not sinking, floating up to the surface, or crashing into rare coral or dangerous rocks.
If you are diving in blue water without a fixed reference, it can be hard to know if you are heading up or down. This can induce vertigo and lead to a potentially dangerous situation. Before you start playing with the camera, be sure to practice good buoyancy skills so that you can stay at a constant depth.
To get close to wildlife underwater, you want to stay relaxed. Move slowly and controlled; don’t chase fish or other marine life, or you are likely to scare them off. Plus, your footage will look better if you pace yourself.
Avoid kicking up silt and dust from the bottom. It will get in front of the camera and make the water murky. There is nothing worse than thinking you have a great shot only to discover later that the cloud of dirt you just kicked up ruined the clarity of the image.
Colors and Light
Colors are different underwater than they are above. The intensity of certain colors like red and yellow diminish quickly the deeper you dive. This image shows how different colors diminish with depth.
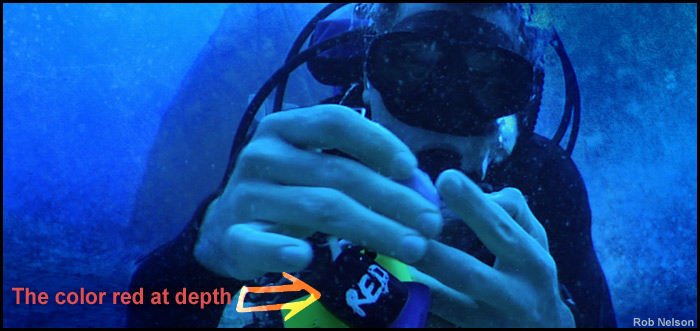
The red-colored tank topper looks almost black and the diver’s skin looks blue! With increased depth, water absorbs color at different rates. Water absorbs red first causing video to appear more blue or green than you hoped. In clear tropical waters, blue remains the longest, and when you are diving in temperate waters, plankton and other particles create a strong green hue.
There are two easy ways to compensate for these color issues when underwater. The first one is to use a color filter on your camera, usually red. It will bring back some of the red in the image you are shooting, making it appear richer. The second option is to use underwater lights. If you are shooting in shallow water, or in clear tropical waters, you probably won’t need them. Always make use of the natural sunlight. The deeper you go, the darker it will be. When you know you will be diving to depths where sunlight is limited, you will need to bring a few extra lights.
Here is a short video we produced about the topic of light underwater. Be patient, the good diving takes place after the first few minutes.
Equipment
Underwater Camera Housing
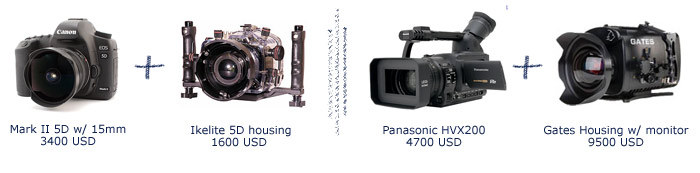
The underwater housing for your camera is arguably the most important (and expensive) item for underwater filmmaking. It is also the best investment you will make because it protects the camera from the hazardous elements of an underwater environment.
For the hundreds of cameras on the market there are relatively few underwater housings. If you don’t already have a camera, you should first look for a quality housing and let that lead you to a camera. In other words, shop for housing first and camera second.
In general, camera housings are mechanical, digital, or a combination of the two. For instance, Amphibico housings are made to work digitally. They usually tap into a digital port on the camera. Many cameras, such as those made by Panasonic, don’t have this port and can’t be used in an Amphibico housing; they require a mechanical housing. Knowing the advantages and disadvantages of each setup will help you choose a camera that suits your needs and filmmaking style.
Mechanical Housings
At Untamed Science we have two different mechanical housings. Generally, they have buttons and pins that go through the hard casing to physically push buttons and turn switches on your camera. The benefit of a mechanical housing is that parts can be replaced if something breaks in the field. The buttons and switches have to be kept in good condition so they don’t jam or get stuck, but you don’t need to worry about electronics getting wet and ruining the electronic board. Gates and Ikelite are two manufacturers who make mechanical housings. There is a huge difference in the final price, but, oddly enough, we tend to like the resulting footage equally.
Digital Housings
Digital housings plug into a port on the camera and operate all the camera functions from digital controls on the housing. They are often constructed so that the buttons are in an ideal place for the diver to control in the underwater environment, usually where your thumbs would naturally grab the camera. This is a real plus. But be advised; an occasional failed circuit board can leave you stranded if you are in a remote location.
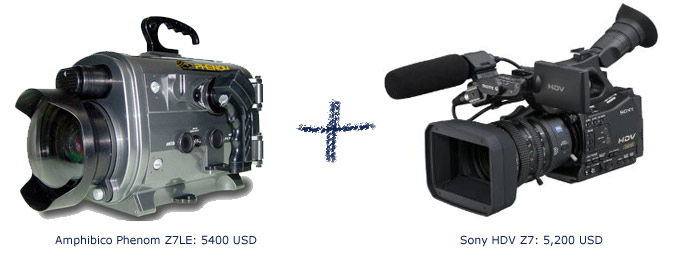
Amphibico housings work well with Sony cameras and are a great example of a quality digital housing.
Watertight bags are a less expensive option, but they tend to restrict your range of depth. In our experience, some tend to leak slightly when you dive below 15 feet or so.
Lights
HID (High-intensity Discharge) Lights
More and more underwater videographers are using HID lights with greater effect than conventional halogen lights. Traditionally, they have a much bluer light than halogens. However, their battery time is limited. HIDs also require large battery packs that mount to your light rig.
LEDs
More energy-efficient LEDs are also gaining popularity with deep water filmmakers. With greater battery life and the decent colors they produce, they are a reasonable alternative to HIDs.
Halogen
Small halogen lights are what most divers carry with them to see things at depth. But these lights cannot be used for video work, as they produce a concentrated and focused beam. If you want your video to look like daytime, you would have to get stronger halogen lights made specifically for use with video equipment.
You also want to consider how you are going to hold both the camera and the light or lights. Most divers use a mounting mechanism that attaches to the camera housing. Lights and mounting is are usually bought separately. If you are customizing your own lighting system, just remember that you will want to be able to adjust the lights underwater without much effort.
More and more underwater videographers are using HID lights with a greater effect than conventional halogen light. Traditionally, they have a much bluer light than halogens although their battery time is a limited. HIDs require large battery packs that mount to your light rig.
The Intricacies of Filming Underwater
White Balancing
To compensate for the change in the color of light at depth, you will need to adjust the white balance as you descend. Remember, white balance is basically the camera’s way of calibrating what white is and all you have to do is hold down the camera’s white balance button when shooting something that you know is white. You can improve the quality of your shots if you consistently adjust white balance as you descend to different depths. All you have to do is remember to bring a white slate. Experienced underwater cameramen may use white dive fins in order to achieve white balancing without hauling along extra equipment.
Focusing underwater
Most of the time, you’ll want to turn off the auto-focus feature on your camera. The camera’s auto focus features work by finding “edges” to focus on. If the camera pans up towards the endless, fuzzy blue of the ocean, the camera will start searching for a focus. At Untamed Science we avoid this by focusing on an object that is about 6 feet in front of us. If you’re always shooting with a wide angle, (you’re not zoomed in) while shooting, this puts almost everything in sharp focus. From here you can fine-tune the manual focus settings.
Think About the Angles
To make your underwater video feel more alive you’ll need to consider the perspective of your shots. Novice underwater filmmakers tend to shoot the entire time from a diver’s perspective: facing down. We encourage filmmakers to get as low as possible and shoot slightly up towards the surface. This creates some very cool effects from the sunlight coming down and illustrates the perspective of an underwater creature.
Stable Shots
If you have a cleared area where you can set the camera down without damaging anything, you could stabilize the camera for a steady shot. Do this by diving with soft dive weights on a weight belt. Then set the weights on the camera at depth. Traditional tripods are difficult to use underwater, especially with a large heavy underwater housing.
Now that you understand some of the basics of underwater filmmaking, have fun and experiment with your own creative style. Jacques Cousteau did not become the world’s preeminent underwater explorer by doing everything according to a book.
2 thoughts on “Underwater Filmmaking Basics”
Comments are closed.


Dear Mr. Tom Campbell,
My name is Ethan Charles Perez and I am in 6th grade and go to Inspiration Academy, Bradenton, Fl. for a project at school I was an underwater filmmaker just like you and in real life I love making films and photography. I was wondering if you would allow me to ask you a few questions. Please respond with a preferred communication. Thank you
I am so sorry I meant to say Jonas stenstrom