Computer Graphics and Animations

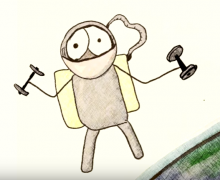
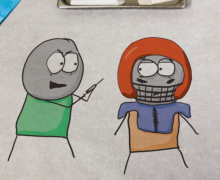
Anyone that edits youtube videos should have a few graphics and animation tools in their toolkit. Even if you’re not an animation wiz, you could start with something as easy as sketch animations, like this.

Animations can be as simple as adding movement to the lower-third title slates for the experts in your film or they can be as complex as 3D animated pieces. While animations might sound a bit daunting or difficult, I’m here to tell you that they’re not. In fact, you need to learn some basic animation and graphics packages in this day an age.

The first thing to learn is a basic photo-imaging tool, such as photoshop. On video that was shot with a tripod, you can actually take a screenshot of the image, go into photoshop with it and manipulate as needed. If there is no movement in one section of the shot, such as the text on a sign, you can change it right in your photo-editing software. It’s the most basic tool, and the building block for complex animations.
The Hand-Drawn or Jittery Text Technique

I’m using this as one of the first lessons in learning some basic animation. In this jittery text tutorial you’ll learn how to make static text look as if it was animated.

Redundancy in Filmmaking

Most video these days is shot on some sort of digital recording device. Rarily is this digital video recorded to a tape any more. Most of the time it goes onto compact flash cards or internal hard drives. Given that hard drives tend to fail every so often, the job of the documentary science filmmaker is to keep track of those digital files. At first, it might seem like a daunting task, but it need not be so. The general rule of thumb is to make sure you have three copies of the files. This can take different forms, and many filmmakers swear to their own method. We’d like to share ours.

Untamed Science uses a single mirrored RAID drive (in it’s simplest form, a unit that has two drives in it, both with exactly the same material on it) and an external drive that we keep in a seperate location. In this case we’re backed up. If we accidentally loose one drive because of fire or flood, the other drive is intact. If up to two drives fail we have a third backup.
Many filmmakers will swear that four copies is the optimal amount for file redundancy. While this might seem like overkill, we often have a fouth backup that we burn to tape on very important shoots. Tapes tend to fail less often and will last longer than hard drives.
Post-production Workflow

Post-production occurs after the actual footage is shot on location. Documentary filmmakers, and science filmmakers will have a slightly different process in post-production than large Hollywood productions. Yet, most of the difference is simply because the scale is slightly smaller. The following workflow, is more or less what every documentary filmmaker does when working up a piece in post-production. We’ll highlight each of these steps in more detail in the following sections, but this serves as a quick overview.

Transfer Media from Cameras to External Hard Drives

While media transfer is often done while on location during a shoot, it is a good place to start our definition of post-production. When the storage devices are filled (almost all cameras now use digital storage) they must be off-loaded to an external device. Now that it is rare to use physical tapes, it is extremely important to have redundancy on a shoot. Hard drives tend to fail every so often. Back up the footage right away to a raid device or two separate external hard drives.

Log and Name the Footage

Now it’s time to transcode the raw video data and name the footage. This is a great opportunity to review all the footage you have and start to name it appropriately. Most editors drop footage into their library alphabetically, so any naming convention should keep this in mind. We like to name footage something like Green-River-Kayaking-001-unloading.movGreen-River-Kayaking-002-launching.mov, … etc.  This naming convention puts the name of the shoot at the start, followed by a chronology (001 – XXX). The short description goes later.  Most operating systems now have no problem with long names, and this allows for quick searches later. For example, I might want a kayaking shot, so I’d search for “Kayaking” and it would pull up all our shots with this descriptor. We encourage everyone to stay away from shorthand naming, because it confuses others that look at your footage. For example, if instead of the above naming system for our Green River Kayaking unloading, it was transfered as GNRKY-01-unld.mov, it wouldn’t be searchable nor would anyone know what that meant later on.

Edit a Rough Build

One of the most useful, quick edits, you can make is to take your raw footage and piece it together in a timeline before leaving the physical location of your shoot. Take the pieces of the interviews you remembered that were amazing, or the hosted sections that turned out best, and drop them into a rough build. If you’re handing off footage to an editor later, this will only help the process. We’ve found that many editors don’t pick our favorite shots. Nine times out of ten it’s just because they missed it, when searching the footage. This just gives you more control. Plus, if you’re editing it yourself, you’ll save the time going back and watching all the footage again at a later date. Our brains have somewhat short memories for remembering what shot was the best even a few weeks after the shoot!

The post production software you choose is up to you, but may include nonlinear editing programs from Adobe and Apple, or one of the great alternative video editing and post production programs like VEGAS.

Add Music tracks

Adding music as early as possible helps unify the look and feel of the piece as it is edited. Many editors will argue that you should edit a piece without music first, and only add the music in at the very end. This advice usually comes from editors who have backgrounds in narrative filmmaking. In this case, they would be right. However, in science and natural history programming, unlike fiction filmmaking, most scenes are built by the mood – a combination of the music and the visuals. By choosing a rough music track early on, you can edit the piece to work with the musical selection. It only helps the end product.

Add Temporary Narration

Now that the piece is starting to take shape, you can start thinking about how a narrator might come in to help explain sections of your film. Even if you’re not planning on using a narrator, this is a good stage for you to add temporary audio that you intend to get in interviewies etc. This added sound track will help you and any first time viewers visualize the flow of the piece better without everything is finally recorded. Narrators aren’t cheap, and they won’t want to do pieces over and over again. You’ll save the final narration for the fine cut.

Animations

Before you’re finished with the rough cut you may also want to request some animations from animators. If you’re working with picky clients you can drop in very rough versions of pencil sketches into a rough-cut, before spending the money on work from an animator. Many animators will help you conceptualize your idea with these simple sketches as well.

Create a Rough Cut

Now that all the components are more or less in place, export a rough cut. Different production companies may have different definitions for what a “rough cut” really is. In essence, you want something cohesive to show others. If it’s too rough around the edges, the viewer will have a hard time reading through the construction and won’t be able to make valuable comments. We’ve also found that if you’re working with clients, the rougher it is, the more they feel the need to add their own creative input. We feel that the more polished you can make a rough, the better. First, most clients and viewers aren’t trained to see through large holes in a film and it makes the quality of your work seem like much less than it is. A low quality rough cut will force you to produce many rough cut versions before you present a fine cut.

Color Correction

After going through multiple rough cuts and fine-tuning everything in the film so that people are happy with it, you’re ready to go about the final touches on the film. The first is color correction. If you’re producing a film for high-end broadcast you may have to send the film out to be color corrected. If you’re on a low budget, you can do it yourself with program’s like Apple’s Color.

Audio Mastering

Audio can be sweetened and mastered at the final stage. Master audio guru’s can take and equalize the audio so that it pops and sounds amazing. At this stage it really is important to get someone who hasn’t seen the film, listen and help with the audio correction. Too often we simply can’t hear mistakes after listening to the film hundreds of times.

Fine Cut

The fine cut should be the last stage before the final draft is submitted. It should be completely polished and almost ready to go. This is where you can review it with friends and peers so they can help you find any glitches in the product. If you’re working with clients, have them sign off on any corrections that you intend to make so that you can move to the final cut.

Make any changes and send in the Final

A common phrase in the industry is that you’re never really finished with a film, you just decide to put it aside. Now that your film has gone through multiple revisions, there is a stage where you just have to finish it and whip you hands clean. Let this be the final copy and move on to the next project!  It’s a great feeling, enjoy it.

Planning Shoot Logistics

Up until this point, your production plan is working out smoothly. All the details, lists, and talent pool have all fallen into place nicely. You can almost smell the sweet success of your film being reviewed by gushing critics. But wait. What’s that foreboding haze coming over the horizon? It’s the netherworld of production logistics.

No, it’s not a nightmare, just a bit challenging at times. If you can find someone who has experience organizing three-ring circuses or herding stray cats, do whatever it takes to sign them on as your logistics coordinator. It’s an important job that deserves serious credit. Here’s why. If there’s one thing that can quickly turn your well-intentioned film shoot into a chaotic mess at your location, it’s poorly planned shoot logistics. Here’s an example.

Imagine having a talented host, two camerapersons, and one director driving to an early morning shoot in to a location that nobody checked out beforehand. Most of the crew has flown in from out of town and they only have the one morning to shoot a crucial segment. They arrive at the location to discover that the person in charge of the location is gone for the morning, nobody will sign the location or on-camera releases, and top it off with the fact that everyone who may be in front of the camera, other than your host, doesn’t speak English. Toss in unexpected overpowering location noise and dust and suddenly you realize that a bi-lingual logistics person to scout the site beforehand would have been worth their weight in P2 cards. Fortunately in this case the director spoke some Spanish, a cameraperson knew some construction site sign language and the host kept smiling. Collectively they saved what could have been a disrupted shoot. The take-home message here is plan the logistics on your shoots well ahead of time and cover all the details. Be sure to check all these boxes:

  • Location permits and permissions, including signing legal production releases
  • Location scouting for right visual fit, access, options, lighting, electricity, special needs for the segment
  • On-site experts or people who will also be in your film – on-camera releases (under 18 years old present special attention), apparel, planned roles.
  • Props and gear that fit the talent and science content.
  • Travel, food, lodging, changing rooms, bathrooms
  • Lighting, animals, trainers, special support crews
  • Secondary plans in event of rain, wind, location issues (consider setting up secondary location beforehand)
  • Duct tape, wire, tools, hot-melt glue, and a bullwhip.

Note that we haven’t mentioned props until this point. Some shoots won’t require many while others require all kinds of fancy or fun props. Your logistics person should have your props ready well in advance of your shoot by adding a special “props” section to your outline or script. The last thing you want is to be digging around for the right props during production with talent and cameras waiting on the sidelines. On bigger shoots, have each set of props arranged by their respective scenes. If they’re a functioning prop, with electrical or moving parts, be sure beforehand that they function properly for the intended action.

Finding Talented Crew

What roles?

It’s good to have confidence that we’re talented enough to perform all the roles in making a film – planning, scripting, directing, shooting, hosting, editing, and special effects in post-production. Even if you were exceptionally talented in all the different roles, it’s a big job for a lone person. That’s why it’s a good idea to spread the filmmaking workload across the ranks of your recruited talent. First, let’s make a list of some of the key roles in making a film.

  • Producer
  • Scriptwriter
  • Logistics Coordinator
  • Cameraperson
  • Audio and lighting
  • Director
  • Host or Narrator
  • Editor
  • Animator
  • Distributor

That’s plenty to start with, even though it’s pretty barebones compared to the credits listed in a Hollywood film. Nonetheless, it represents the major roles that you’ll need to fill with talent. How you fill those roles with talented people depends on your budget, your friends, and classmates if you have them, relatives, and fellow filmmakers. Let’s assume that you’re limited on your budget and prospective talent pool, and you’ll need to combine some roles. That makes perfect sense and we often combine roles on smaller productions. When combining roles, avoid roles that may overlap during production such as cameraperson and host. Those are almost impossible for one person to perform at the same time. Here are some logical combinations seem to work.

  • Producer, scriptwriter, director, animator
  • Logistics coordinator, camera person, audio and lighting, editor
  • Host, narrator, script editor, logistics assistant, distributor

Based on that combination, you may only have three people on your skeleton crew but that’s enough to produce your film. To take full advantage of your small crew, be sure to openly exchange ideas and help one another during each phase of production. For instance, the director, host and cameraperson can all help dress the set or prep the location, work with lighting and audio while collectively offering ideas on how to best shoot a segment. Having the cameraperson also be the editor has the advantages of knowing what shots to get during shooting for the upcoming edit. Then later on, the editor will already know the shot inventory that they shot as cameraperson. It makes for an effective overlap of roles.

Where to get talent?

So what’s your plan if your friends, classmates, or relatives don’t have any talent in or interest in filmmaking? As unlikely as that seems, you may still need to search out and recruit key talent for your film. Let’s make the job easier by further combining roles. This is your film so you should be able to assume all of the roles except the host and possibly narrator. A variation to this is that if you’re also a good host and need to recruit a cameraperson to film you. Considering those two scenarios, you may need to recruit a host or cameraperson. One other role that you may need to recruit is an animator. And that depends heavily on the content of your film. Some science topics such as chemistry need to be revealed at the molecular level that we can’t capture with the video camera. A good animator can make those concepts come alive for the audience. So if the topic demands it, add an animator to your recruitment list.

The ways to compensate your prospective talent pool could be with payment for services, end credit notoriety and experience in filmmaking, services traded (they help you and you help them), product or gear trade, or any other creative combination of those elements.

Where do we find that potential host, cameraperson, and animator? Fortunately, they’re often in similar places. Here’s a potential list of where to begin your talent search.

  • Community college or technical institute – courses in your science topic, filmmaking, media, acting
  • College graduate programs – cover your science topic, filmmaking, media, acting
  • Local television news stations
  • Local filmmaking or production groups
  • Local theater productions or acting schools

It’s pretty amazing what you can accomplish in your search using the Internet. Craig’s list, batch emails, casting calls, can turn up dozens of leads in no time. And don’t forget the timeless telephone cold call. Even if your prospect source can’t help, many have other names and contacts they will pass along when you specifically ask for them.

One final note about looking for narrators. If you don’t have a quality host and need to put narrative flair into your film, take the extra time to find a narrator that fits the theme and feel of your film. Online searches will give you dozens to choose from where you can listen to their voices. Just be sure their talent fee matches your budget.

Creating a Shoot list

Some experienced producers like to shoot from the hip without a shoot list. They may get all the various shots they need to tell a compelling story by simply pointing their camera and pressing record, but they may miss some vital shots. That’s why many producers use a combination of relying on their experience along with a story outline to help them record all the footage they need. A detailed shot list can be a very helpful tool.

The good news is that your shot list is easy to develop when you consider your list of characters, settings, and story outline. Think about the images you need to tell your story, and flesh out a list of shots to portray each part. In addition to these primary shots, you also need to consider getting “B-roll” or cover footage: supporting footage of settings, characters, and action that help tell the story. If you don’t shoot enough of this type of footage, you will end up with a film full of talking heads that will lull your audience to sleep. Plan on shooting a lot more cover footage than you think you’ll need to show your story.

Here’s an example shot list for our manatee film:

Setting

Establishing shots: Aerial views of the Florida coast (flyover), Google Earth, maps, NASA imagery
Wide shots of towns, water treatments, boat harbors, discharge outlets, manatee advocacy group headquarters, Department of Tourism offices, clearwater springs, research centers
Medium, close elements of above noted settings above that help tell story
Static shots, wide angle, of settings that connect foreground elements with background elements that show your story. Connect people, manatees, and action with settings.
Water, waves, beaches, coastlines, canals, pelicans, seagulls, lively elements of settings (from big stuff to fiddler crabs)

Characters (not your host)

Interviews of characters: Have experts and characters look “off camera” during their interviews. Only the host should look at and interact with the camera. (More on framing and shooting your experts during production.)
Characters in action, doing their thing. Wide and close shots of action that supports their stories and their interaction with other characters. Manatees in relation to their environment including the threats they face and possible solutions to these threats.
Places and things related to characters: boats, buildings, co-workers, laboratories, facilities, and agency buildings.
Close-ups of characters faces in thought, looking, working, interacting, reacting, hands in action, feet moving, picking up and putting down things relative to the action within the story.

Host

Creative “action building” sequences of host getting to opening scene: arrives in car, unloads gear, takes off to meet expert, puts on gear to snorkel with manatee researcher.
End action sequence to pose “big question”
Bridge shots: between segments at locations with action; wrap one segment and provide lead to next scene or event
Wrap shot with “take-home message”
Similar shots to those of characters during host’s discovery and interviews.

Main Characters (Manatees)

Underwater shots, lots, medium and close – interactions and head shots
Above-water shots
Establish connections between manatees and threats or solutions
Connecting shots between manatees and various characters and host
Antagonists
Boat propellers: boats, engines, docks, wakes, wheels, boat related stuff & action
Fishing lines: people fishing, reels, rods, hooks, lures, casting, baiting
Affluent community discharge: facility, pipes, current, foam, water interface, fence, hand opening big valves, underwater interface
Coastal climate change: sun, moon, steam, smokestacks, electric lines
Sea grass impacts: sea grass, sea bottom, wastewater plant, water discharge
Sanctuary loss: human-dominated canals, dredging, boating, developments
Time ticking by: time-lapses, weather, clouds, tides

Another good resource for choosing shots can come from your experts during an interview. When the interview is over, you can get cover footage of crucial elements they discussed.

If resources allow, you could also have a two-camera shoot and have the second cameraperson collect the needed B-roll footage.

Scripts and Outlines

To script or not to script? When you are on stage with other actors, you need to follow a script, but in a science or wildlife film, the needs are slightly different.

Few people can deliver engaging, believable scripted lines in front of a camera. For most of us, speaking someone else’s written word from memory fails to convey genuine feeling and show emotion. To get content that comes naturally and in an almost spontaneous fashion from hosts or other characters, simply let your characters tell their stories. Ask anyone how they feel about careless boaters slicing manatees with their propellers, and you will likely get some genuine heartfelt responses in front of the camera. They will sound more convincing than any scripted lines you could write.

On the other hand, few people can consistently present scientifically accurate and complete phrases in front of the camera without memorizing scripted lines. A smart way around this is to script important science-specific content and see if your host is willing to talk specifically to those points if they didn’t cover it earlier.

Try to capture a blend of unscripted vibrant stories told to the camera with an occasional scripted section on the stickier science stuff.

It’s crucial that you are accurate and meticulous in the presentation of your research. You will receive plenty of accurate science from your host and on-camera characters, but it never hurts to double check. And if an on-camera expert misses an important science point, you can cover it with footage and a voice-over from your host.

The Camera

I’m sure you’re itching to start shooting.  In fact, I bet you already have, but do you know the tricks of the trade?  Do you know the industry standards?  Before you start making a new style for yourself, you better know what tools you have to choose from. The first thing we would like to do is show you the variations in camera.

Once you have selected a camera you’re going to need to know some basic techniques used in filmmaking.


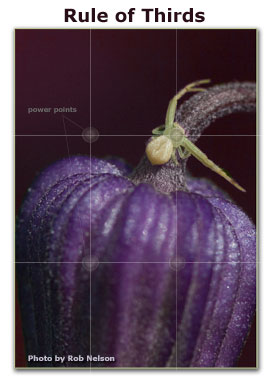
ruleofthirdsProper framing

The first thing to learn is how to frame your subject.  If you’re a still photographer you’ll already know about the rule of thirds.  This works for filmmaking as well.  Notice the website below.

The rule of thirds:

This is a general principle in photography, which is generally considered to make shots more appealing to the eye.  One can easily visualize this rule by taking a frame and dividing the horizontal piece into three equal sections and dividing the vertical in three equal sections.  This creates 9 equal sections.  Where these sections meet are four points on the frame.  By aligning the central object into these points of the frame (often called the power points), instead of centering the object, you get more aesthetically and professional-looking shots.

However, we should note that while we describe this as the RULE of thirds, it might better be used as a guideline.

Common uses of this rule in video are:

  • Framing an interview: The eyes of your subject should fall in one of the upper powerpoints and the subject should be looking towards the empty space on the frame.
  • Shooting a horizon: Rather than position the horizon on the center of the frame, align it along the upper or lower third depending on what you want to emphasize.  For example, if you’re shooting a cloud time-lapse you will want two-thirds of the shot centered on the sky.

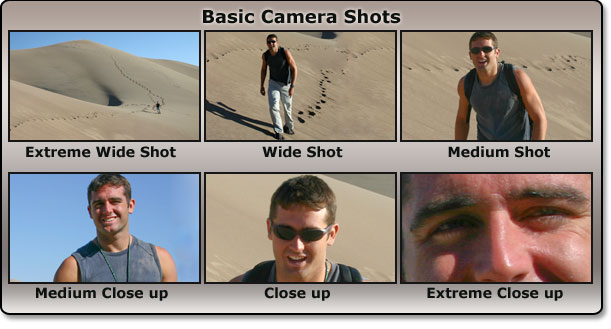
Basic Camera Shot types:

Extreme Wide Shots (EWS) act to establish the area.

Wide Shots (WS) show the entire person or area.  They’re great for establishing the scene and allow for good action of the characters.  Sometimes this is known as the long shot.

Medium Shots (MS) frame the subject from the waste up.  This is the most common shot and allows for hand gestures and motion.

Medium Close Ups (MCU) shots show the subject in more detail and are often framed from just below the shoulders to the top of the head.

Close Ups (CU) show a particular part of your subject.  For people this usually means the shot frames just the head!

Extreme Close Ups (ECU) are much tighter close-up shots in which you get detail greater than the human eye might be able to normally perceive.  An example of this shot might be of the mouth and eyes together

Camera-Shots


Advanced Camera Shot Types

Two Shot: This is a shot of two peoples (or other individuals) together.

Cut Away (CA): Cutaways are used in the editing process to fill in footage which is different from the main action.  B-roll is often used for cut-aways.  An example might be a cut away of a bird singing if the shot is focused on a couple in the woods.

Over the Shoulder Shots (OSS) are shot from behind the person towards their subject.  Generally the frame is cut off just behind the ear, although there are several variations.  A good technique to use to get this shot is to frame the person facing the subject with about one third of the frame.

Point of View (POV): This is an effective shot that gives the audience the feel that you’re seeing it from the eyes of the performer.  It is taken from near the eye-level of the actor and shows what he might see.  It could be used to give the perspective of other animals too like a frog, a bird, or a fish.

Selective Focus: By using a large aperture value (f/1.4, f/2.0) you will be able to create a shallow depth of field.  This effectively leaves one part of the frame in focus while blurring others, such as the foreground or background.  When you change the focus in the shot from the foreground to the background you’re doing another advanced camera shot called a rack focus.


An Example: A story about bats

Try it yourself: Can you find the different camera angles and movements that we described above in this short we made? Make a short list as you watch the video. Would you have taken different shots?

A List of Wildlife Film Festivals

One of the best ways to let your film work for you is to submit it to a series of wildlife film festivals. Through our connection with the major wildlife film festivals, we’ve slowly learned when and where they all are. We’d like to share a complete list of environmental film festivals for you here.

The two big film festivals are Wildscreen and the Jackson Hole Wildlife Film Festival. They alternate years so as not to loose the relatively small number of wildlife filmmakers that will make the journey here each year.  Other than these two, there are a few others worth noting.

Other Environmental Film Festivals

If your wildlife or science film festival is not on this list, please send an email through our contact form.

Post-Production

Post-production is defined as and occurs after the actual footage is shot on location. Documentary filmmakers, and science filmmakers will have a slightly different process in post-production than large Hollywood productions. Yet, most of the difference is simply because the scale is slightly smaller. The following workflow, is more or less what every documentary filmmaker does when working up a piece in post-production. We’ll highlight each of these steps in more detail in the following sections, but this serves as a quick overview.

Transfer Media from Cameras to External Hard Drives

While media transfer is often done while on location during a shoot, it is a good place to start our definition of post-production. When the storage devices are filled filmmakers must off-loaded the data to an external device. Now that it is rare to use physical tapes, it is extremely important to have redundancy on a shoot; hard drives tend to fail every so often. Back up the footage right away to a raid device or two separate external hard drives.

Log and Name the Footage

Now it’s time to trans-code the raw video data and name the footage. This is a great opportunity to review all the footage you have and start to name it appropriately. Most editors drop footage into their library alphabetically, so any naming convention should keep this in mind. We like to name footage something like Green-River-Kayaking-001-unloading.mov, Green-River-Kayaking-002-launching.mov, … etc.  This naming convention puts the name of the shoot at the start, followed by a chronology (001 – 999). The short description goes later.  Most operating systems now have no problem with long names, and this allows for quick searches by the editor. For example, if we want a kayaking shot, so we’d search for “kayaking” and it would pull up all our shots with this descriptor. We encourage everyone to stay away from shorthand naming, because it confuses others that look at your footage. For example, if instead of the above naming system for our Green River Kayaking unloading, it was transferred as GNRKY-01-unld.mov, it wouldn’t be searchable nor would anyone know what that meant later on.

Edit a Rough Build

One of the most useful, quick edits, you can make is to take your raw footage and piece it together in a timeline before leaving the physical location of your shoot. Take the amazing pieces of the interviews or the hosted sections that turned out best, and drop them into a rough build. If you’re handing off footage to an editor later, this will only help the process. We’ve found that many editors don’t pick our favorite shots. Nine times out of ten it’s just because they missed it when searching the footage. This just gives you more control. Plus, if you’re editing it yourself, you’ll save the time going back and watching all the footage at a later date. Our brains have somewhat short memories for remembering what shot was the best even a few weeks after the shoot!

Add Music tracks

Adding music as early as possible helps unify the look and feel of the piece as it is edited. Many editors will argue that you should edit a piece without music first, and only add the music in at the very end. This advice usually comes from editors who have backgrounds in narrative filmmaking. In this case, they’re probably right. However, in science and natural history programming, unlike fiction filmmaking, most scenes are built by the mood – a combination of the music and the visuals. By choosing a rough music track early on, you can edit the piece to work with the musical selection. It only helps the end product.(any tips on combining music and video with edits?)

Add Temporary Narration

Now that the piece is starting to take shape, you can start thinking about how a narrator might come in to help explain sections of your film. Even if you’re not planning on using a narrator, this is a good stage for you to add temporary audio that you intend to get in interviewees etc. This added sound track will help you and any first-time viewers visualize the flow of the piece better. Narrators aren’t cheap, and they won’t want to do pieces over and over again simply because you were still “figuring” out what you wanted to say. You’ll save the final narration for the fine cut.

Animations

Before you’re finished with the rough cut, you may also want to request some graphics from animators. If you’re working with picky clients you can drop in very rough versions of pencil sketches into a rough-cut, before spending the money on work from an animator. Many animators will help you conceptualize your idea with these simple sketches as well.

Create a Rough Cut

Now that all the components are more or less in place, export a rough cut. Different production companies may have different definitions for what a “rough cut” really is. In essence, you want something cohesive to show others. If it’s too rough around the edges, the viewer will have a hard time reading through the construction and won’t be able to make valuable comments. We’ve also found that if you’re working with clients, the rougher it is, the more they feel they need to add their own creative input. We feel that the more polished you can make a rough, the better. First, most clients and viewers aren’t trained to see through large holes in a film and it makes the quality of your work seem like much less than it is. A low quality rough cut will force you to produce many rough cut versions before you present a fine cut.

Color Correction

After going through multiple rough cuts and fine-tuning everything in the film so that people are happy with it, you’re ready to go about the final touches on the film. The first is color correction. If you’re producing a film for high-end broadcast you may have to send the film out to be color corrected. If you’re on a low budget, you can do it yourself with program’s like Apple’s Color.

Audio Mastering

Audio can be sweetened and mastered at the final stage. Master audio guru’s can take(what’s this?) and equalize the audio so that it pops and sounds amazing. At this stage it really is important to get someone who hasn’t seen the film, listen to and help with the audio correction. Too often we simply can’t hear mistakes after listening to the film hundreds of times. To help you understand the audio basics I made this short video.

Fine Cut

The fine cut is the last stage before the final draft is submitted. It should be completely polished and almost ready to go. This is where you can review it with friends and peers so they can help you find any lingering glitches in the product. If you’re working with clients, have them sign off on any corrections that you intend to make so that you can move to the final cut.

Make any changes and send in the Final

A common phrase in the industry is that you’re never really finished with a film, you just decide to put it aside. Now that your film has gone through multiple revisions, there is a stage where you just have to finish it and whip you hands clean. Let this be the final copy and move on to the next project!  It’s a great feeling, enjoy it.