3D Wildlife Filmmaking
Since about 2007, 3D filmmaking has become more of an interest for the general wildlife filmmaker. And 3D filmmaking is not nearly as complicated as it might sound initially. All you need is two cameras of the same model, shooting side by side. In post-production, you can sync the two shots together with a simple plug-in or two that allow you to export the file as a 3D render. Here are the main steps.
Setting the Cameras
There are a couple of arrangements you can use to set up your cameras for 3D video, but the end result is the same. You’re trying to set the cameras at the ends of an isosceles triangle. The distance between the two cameras and the angle they then need to point all depends on how far away the object is that you want to pull out of the 3D frame.
The first thing you have to adjust is how far the cameras are apart. This is known as the interocular distance. Roughly, you’re looking for a 30:1 ratio. If your object is 30 feet away, you can have your cameras 1 foot apart. That should allow you to set two cameras up side by side. However, if your object is 2.5 feet away, then you need to have the center of the cameras only an inch apart. To achieve this, filmmakers use big mirror rigs, so that one camera is shooting down into the mirror, and the other is shooting through the lens.
The second thing you have to adjust is the angle of the cameras. The cameras can’t both face the same parallel angle. Instead they are going to have to angle in towards the object you’re trying to bring out in 3D. Again, think about the triangle.
Editing the footage
In the editing phase you’ll bring in footage from both cameras. This can be done in Final Cut Pro or Adobe Premiere with the help of programs like Stereoscopic 3D or Cineform neo3D. These programs and plug-ins allow you to sync the right and left cameras into one single clip and choose a 3D output mode. YouTube has made it even easier by doing it all for you. All you need to do is export the right and left cameras side by side and YouTube converts it into all 3D formats. Then viewers can decide what version they want, depending on their setup (red-green glasses, blue-green glasses, polarized glasses, etc.).
Popular 3D Wildlife Films
A good place to start your quest in 3D wildlife filmmaking is to research what has been done before. Almost everything done in 3D has had a huge budget (though this is changing). The cameras are large and heavy, giving the shots a particular look. There is little dynamic movement and almost no hand-held work.
Here is a list of some popular 3D wildlife films in the last decade:
3D filmmaking on a 2D budget
The following consumer cameras have been released to the market (as of 2014) as inexpensive 3D devices so that filmmakers can shoot in three dimensions on a small budget. We understand these cameras will change with time, but the list should help you realize there are a lot of options out there.
- Sony Cybershot
- Panasonic Lumix 3D
- GoPro Hero 3D rig
- Olympus SP
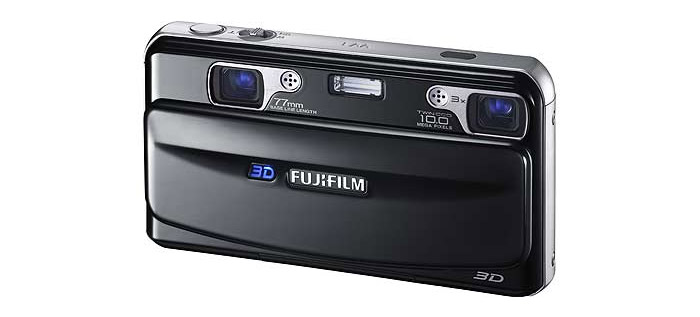
- Fujifilm FinePix REAL 3D W3 1: The setup allows for the capture of high-definition footage. It retails for about 400 USD.
While we haven’t explained all of the details of 3D filmmaking here, we wanted mainly to emphasize that it’s not as hard as it seems. To explore 3D further, do a simple YouTube search for DIY 3D filmmaking. You’ll find examples of how to setup simple cameras and how to render the final video in post-production. 3D filmmaking is finally within reach for the aspiring filmmaker…and the market is just begging for content.
More Resources and Books on 3D filmmaking
- This is a great little article published in the POST magazine on the challenges of a group of filmmakers trying to make a 3D film in the arctic on a 2D budget.
- 3D Movie Making: Stereoscopic Digital Cinema from Script to Screen (The definitive book on the subject)
- Digital 3D Stereo Guide (book)
- 3D Film Factory: Rigs, Monitors, Gear, Production and Training


