Unfortunately for many amateur and even experienced film-makers, talent and skill at film-making usually isn’t enough to set yourself off on the path to success. While film-making is an art, to make money you need to look at the business side of things. That means that art itself isn’t enough. You need to know how to market yourself, and how to promote everything that you do. That can seem intimidating, especially if you’re new to the industry, so looking through these five top tips on how to market yourself and your film-making skills can give you a boost, and help you on the road to fame and sustainability in this difficult industry
Create A Brand
Sometimes, your name just isn’t enough. Consider tying it to an inventive, easily recognizable company – think ‘Bad Robot’ or ‘Scott Free’ for J.J. Abrams and Ridley Scott. Along with a name, you’ll start thinking of logos, ideas around your aesthetic and, soon enough, you’ll have a personal brand for your film-making. Sure, this won’t instantly skyrocket your fans, but it gives them a platform to find and follow you, and a catchy one at that. Consider names – consider slogans – consider logos – but, most of all, consider your brand, what it means to you, and how it can represent you out in the wide, wide world.
Part of the UntamedScience brand is finding the edgier side of science
Get A Website
“These days, everything is online, so you need to be there as well,” says Allan Wilkes, a script writer at Writinity.com and Researchpapersuk.com, “and it’s not just in the film-making industry that websites are important. In order to have any sort of brand or company, you practically need a website in the 21st century. It’s somewhere people can find you, or something they can search for if they’re interested in you already. Websites can be portfolios as well, which always helps you out.” And with some website services offering a free basic plan, you’ve really got nothing to lose. Shop around for the best deal, and see where your budget can take you, but remember that websites are everything in this modern world of business.
Social Media
You probably have a personal social media account on many different platforms – this is not what we’re talking about here. Create new profiles (‘business’ profiles or pages if applicable) and get the news about your newest film or project flowing. Reveal ‘behind-the-scenes’ footage, post consistently, and develop a fanbase online. Social media can be a brilliant tool to network as well, since you’ll find many other film-makers like yourself out there, and this can lead to great opportunities. Create some high-quality content, interact with your ‘followers’ and get started creating your digital community!
Find Your Critics
Critics should never be seen as a bad thing in film-making. So, if you’ve got a released project, reach out to them! Search on IMDB and find critics who reviewed similar films to yours, or films with the same actors or producers as yours, then contact them and pitch your project to them, mentioning the similarities to other films which they have reviewed. The publicity benefits both of you, and you’ll lose nothing but gain some constructive criticism, which you can then put towards your next project.
Video Advertising
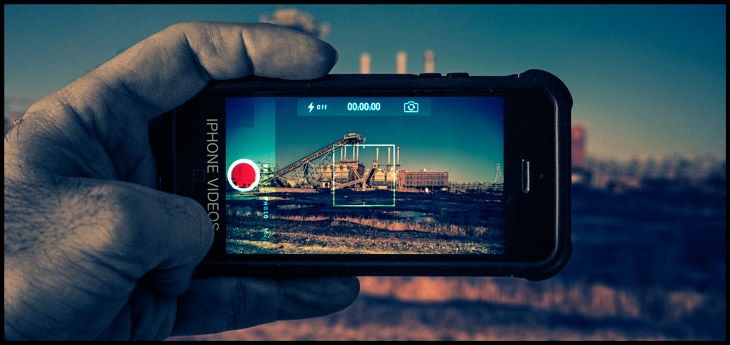
If you haven’t already got a trailer, then you need one for this tip. “Everybody watches Youtube, or some sort of similar video-hosting website, and lots of businesses capitalize on this with video ads – why not you?” Elsie Metcalfe, a movie blogger at Draftbeyond.com and Lastminutewriting.com, questions. “Youtube finds your audience and delivers them your content, creating interest in your project. But make sure you include something along with your trailer: a call to action. Incite your audience to ‘click’, to take action – it might be following your social media page, or going to your website. Whatever it is, it makes sure that interested viewers don’t just ‘watch and forget’ your ads – they’ll take action, remember your project, and, hopefully, become fans of your work.”
Here is an example of one of UntamedScience’s new brands, StoneAgeMan
article by : Valerie Caswell works as a marketing professional at Lucky Assignments, as well as Gum Essays. Reading and writing about aspects of marketing online and modern entrepreneurship are her hobbies, and she is a firm believer that you never stop learning in life.
Not all science filmmakers work with animals. However, it’s important to be diverse if you want to make it in this field. Doing filmmaking with animals can be difficult. However, photography is a good way in as well. If you can make it as an animal photographer, it’ll open doors down the road. Plus, it’s a great skill to have.
Animal photography, whether you’re a professional or a casual photographer, is a fun way to spend your time. If you’ve got a camera or even a high-quality camera phone, here are a few reasons why animal photography is a great pastime to take up.
It Shows The Beauty of Nature
This sounds a little bit trite, but learning the beauty of nature is something everyone should learn, especially in a time of climate uncertainty. Animal photography can show nature in a light never seen before.
It’s actually different than going out and just being in nature. With photography, it makes you look closer at the details you might have missed. Plus, you’re able to show animals from a whole new angle. Depending on your lighting, color, and what angle you shot the animal, viewers can see nature from a new point of view and they may connect with it more.
It Humanizes Animals
There are many people who become more sympathetic to animals once they have a human element. Taking a picture of your dog salivating over some delicious food is one such example. Another method you can try is learning how to humanize animals who have a more fierce reputation. For example, taking a picture of a sleeping tiger shows the animal to be one giant cat, and gives people a reason to want to save them. Putting wildlife closer to humans or pets can do wonders.
Take some photos of the most dangerous snakes in a funny situation, or show some piranhas swimming about without a care. Obviously, exercise caution should you decide to take some pictures of animals.
You Learn To Take Pics of What You Can’t Control
There are many things you should learn about your camera, from its shutter speed to how much ISO you need. By teaching yourself learn memorization techniques, you can map out everything your camera does and be a master photographer.
You can control the camera, but what you usually can’t control is the animal. Unless you’re taking pictures of your trained dog, nature can be unpredictable. You need to learn to take that shot ASAP, because the animal may never be in that pose again. If you’re shooting outside, you usually can’t control the lighting. Learning to take pics of what you’re given is a great lesson.
It’s Relaxing
Finally, one reason why getting into animal photography is a fantastic idea is because it’s relaxing. When you’re outside, the calming effects nature has on you are quite good. From uplifting your mood to calming your anxiety, getting out of the house and exploring the great outdoors is great for both the mind and body.
With that said, if you have extreme depression or anxiety, you may need more help. Consider seeking help from online therapy. Or, if you have the credentials, a job in online counseling may work. Click here for more information:
Photography Tips
If you’re wanting to get into nature photography, knowing a few tips can make your photos stand out. Here are some pointers:
Always remember the rule of thirds. For photography newbies, this is when you divide your photo with two horizontal and two vertical lines. There are many cameras that will have these lines built into their display to make it easier. Putting your subject in places where these lines intersect can make your image more eye-catching.
Be mindful of the lighting. Experimenting with different times of day can give you an idea of what you want your image to be.
To catch an animal in the moment, make sure your shutter speed is high. If you want your animal to have some motion in the photo, lower the shutter speed a bit.
Invest in a drone. Drone photography can take your shots to a new level and allow you to take pictures from places you could never have reached.
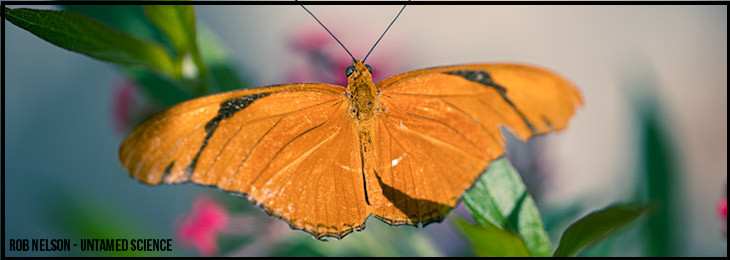
Take a look at our other photography tutorials and explore some nature photographers. See how they shot their pictures and use that for inspiration. Rob Nelson and Jonas from Untamed Science are good examples.
Try it today, and explore the fun of animal photography now!
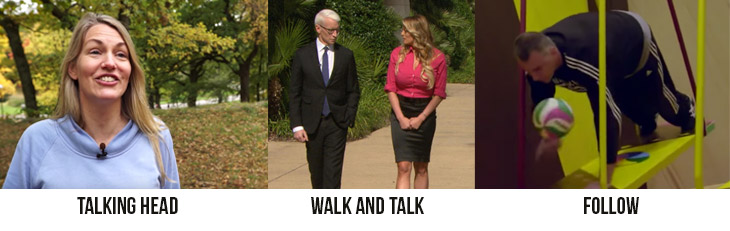
There is an art to getting good information from someone who is on camera. There are many ways that you can do this, but we’d like to divide interview styles up into a few basic types.
Talking Head: The standard type of interview that many people think of when they hear they are shooting an interview is the ‘talking head’ or ‘three button interview.’ In this scenario, the subject is placed by themselves in the frame and they talk to the interviewer off-camera. It is by far the easiest one to capture and the easiest to get good clean talking bits from. A variation of this might be a sit-down interview where the interviewer and the interviewee are both talking to each other, but with similar framing.
Walk and Talk: In some ways, this is a difficult interview to pull off. You establish the host in the shot and they’ll talk to each other. The goal might be to make the interviewee more comfortable, but it does take a lot of coordination with the camera crew to make sure everyone moves at the same pace without distracting the two on-camera people.
The Follow: In many situations you may just want to follow the action during the interview. This is my favorite type of interview, as it gives life to the people on camera. It’s also the most difficult to pull off because you have to have good audio, hosts and camera people who are able to capture the action while it’s happening.
Shooting Interviews on a Budget
Shooting interviews is a basic skill as a filmmaker. It should be something everyone learns early on in their progression. They don’t need to be shot with a fancy camera or with any fancy gear either. A few years back we made a video specifically for students whereby we tried to show them the basics of shooting interviews so that they could go make their own. We focused on simple techniques and using basic gear – like a phone or Gopro. The following video highlights those simple techniques.
The main points to remember are:
LOCATION: Choose a good location such as making sure the light isn’t too bright and it’s not too windy
AUDIO: Remember to get good, clean audio. That means getting a lav mic or boom microphone.
COMPOSITION: Compose the interviewee according to the rule of thirds.
QUESTIONS: Prep your interviewee and ask good questions.
Advanced Interview Skills
Expanding on the above video, we made this one that gives more tips on the interview process.
In it where we covered these basic points.
Types of Interviews: Walk-and-talk interviews vs. Locked down (stationary)
Choosing what lens to use. Wide angle lenses are busier as it shows more of the stuff going on in the background but can feel more “personal” (news report look). Long/telephoto lenses are more cinematic and more studio-like. They have a fixed backdrop and are often cleaner.
Equipment you Need: Besides the camera, there are a few essentials, like tape and a light or two.
Interview Prep: To make the interviewee comfortable, there are a few things you might want to say to get the comfortable and make sure you don’t get them answering yes or no to your questions.
Answering Interview Questions:
As a special thanks to our patrons, we wanted to spend a second to cover their questions in more depth.
1. Where to Look?
Tobias asked: “Is it better to ask the people to look into the lens or to a person standing next to the camera?”
There is no right answer here. However, I would say that in my experience, having an expert talk off camera gives them some cred as a person who is simply giving the facts or stating their experience. As soon as you start looking into the camera you have changed the interaction that person has with the documentary. They are now subtly part of the narrative. Now, they come off as a kind of host. It is as if they are now, no longer impartial to the story that the documentary is telling. I think this now establishes them as the storyteller.
Also, looking directly at the audience through the lens is a skill that doesn’t happen overnight. It’s generally difficult for most people do to this and so I rarely use it when we interview experts. The other challenge is that if you do have a host, you may not want to compete with multiple people talking to camera. One exception to this was with the emerald ash borer video we just finished featured below.
Jiri, our expert really owned that story and had a story he wanted to tell. He was good at talking and actually suggested he just talk into camera for that interview. We shot many backups where he didn’t, but I liked the ones where he talked into the lens.
2. Green-screen or Natural Background?
Jeff asked, “What about green screening a backdrop with another video or motion graphics playing in the background? Is that a technique that is looked at as being a pro look or is it thought of as being kind of cheesy (technical term lol) or an amateur move? Thinking that having a background of let’s say white with a transparency of 50% and then a video behind that. Just a thought. Looking forward to Tuesday as always:-)”
This I think is a stylistic choice. First, let’s remember that you can almost always tell that it’s in front of a green screen. So, what does this tell you as the viewer? I think it tells you that it was shot in a studio first and foremost. If you capture more of the background in your shot, it clearly shows that you’re out in the environment. To me, this feels more natural.
However, there are situations where I think it works well, if not even better because it gives consistency to a program. Take this clip show piece of our friend Carin Bondar on Outrageous Acts of Science.
The benefit here is that the producers can fly to 10 different cities to interview the subjects, but put them all in the same background. This would give unity to the show. Plus, nothing in this show’s background is possible in a real set and it lightens the mood to something that was intended to just be fun.
To get to your point about it being cheesy. Yes and No. It can feel cheesy if it’s not done well or the background looks bad. I think it’s really easy to mess it up and that’s why I prefer sticking to a more basic blurred out and “real” background.
3. Stand-up Interviews or Follow Interviews?
Johanna asked, “What is the main purpose of the stand up interview, on site? What I’m noticing in reviewing our projects, is that a walk around interview seems to go better, in terms of the quality of naturalness of the interviewee, but the visuals run amock as we try to follow and get focus. So, is it a trade off? Also, over the shoulder while driving or looking at a computer screen seems to get better comfort and enthusiasm from the biologists. I’m to the point of telling our team, don’t even bother with the stand up interview. The most interesting stuff (to me anyway) seems to be when we are over the shoulder, following, chatting. Yet, pros, always do the stand up interviews, so why?”
This is a great questions Johanna. It’s not something that a lot of young filmmakers even think about. How many have really though, “what is the benefit of getting a static interview?” and “what does this do for our story?” First, let’s be clear – it is much easier to get a stand up interview or static interview with clean audio and everything in focus. You will, however, loose the dynamic nature of the scientist unless they’re really good. And, even if they are good, the static nature of it is usually dry. I almost always shoot these purely as backup. I try to get as much as I can following the researchers. It makes for better storytelling, but as you’ve discovered, is much harder to do. I only do this style of filmmaking when I know I have Jonas or Haley with me, both of whom I’ve shot with for over a decade.
I think when you’re on a mountain cliff though, I’d have skipped the static interview. You can always get that back on dry ground with a long lens and blurred out background. When you’re in the midst of the action, I’d shoot for the action.
4. Self Shooting Interview Tips
Corey asked, “Any tips on self shooting in these situations would be helpful and appreciated!”
Self shooting interviews is clearly harder than not, but it’s doable. Here are a few tips that come to mind.
A tripod is your friend. Set it up and lock the focus. Then, trust your settings and turn into the interviewer.
Try not to look at the camera too much as this will distract the expert.
Given that you can’t control the camera as much, understand you’ll have to forfeit excessive shot changes. One (or two) types of shots is all you can feasibly do.
The tips Jonas gives in his interview videos above do a good job walking through key things to tell them. I recommend doing all of those.
Other than that, I think it’s about the same as shooting with two people. The benefit of shooting with a camera person is that you can spend more time getting the person you’re interviewing to feel comfortable with the process and you. When I do interviews I almost ignore the camera crew and talk a lot to the experts. I make sure we only have small talk though – nothing about the subject we’ll talk about. This way they’re telling it to me fresh each time.
While you may or may not have known that toy photography is a thing, I’m here to open your eyes to a whole new world that you can do inside your house with only a few lights and the magic of photoshop. In this guide, I want to step you through my process, from start to finish. I’ll start with how I composed gollum into a scene from the ring and move on to general techniques from my past shoots. To get you excited about it, I suggest first watching this video:
Toy Photography Techniques
I’ve tried to highlight each of the techniques I consciously use while taking toy photographs and then elaborate on each with a few descriptive photos from past shoots.
1 – Use a Tripod
One of the most important tools in my kit (other than the camera of course) has to be the TRIPOD. Without it, many of my shots and ideas would either fail or not be achievable at all. For a number of my shots, I have shot in night/dark environments which require a long exposure to compensate for the lack of light.
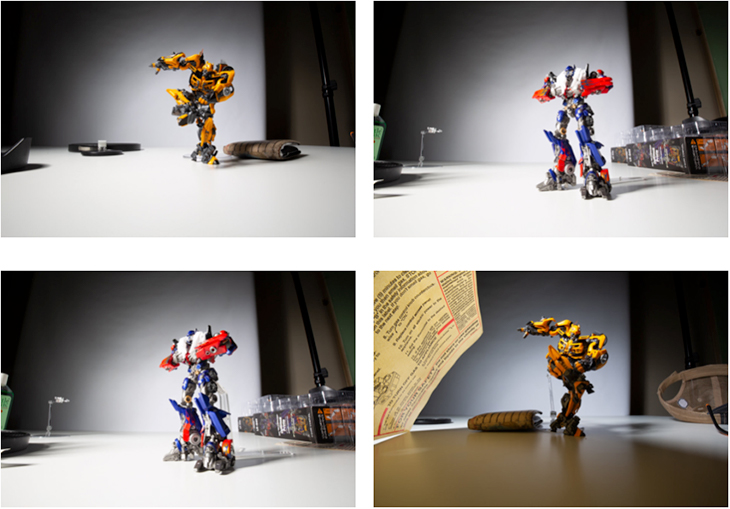
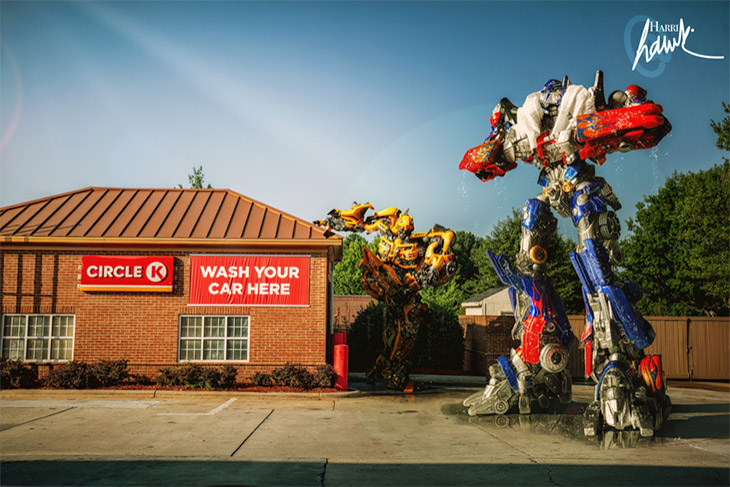
As you can see from this test shot above, I am pretty blurred. This shot was taken at F4.5 at 1/13sec shutter speed. But having the camera mounted on a tripod, locks the camera and the shot is not blurry at all. Now you might say “well if the light is bright, I don’t need a tripod.” This is true. For the transformers at the car wash shot, (below) I was taking pics without the tripod (see the shadow). This is because I was only taking 1 shot for the background and not combining multiple shots like in the ring shot. Managing multiple variables is a skill I also apply to my digital work, where I carefully analyze and rank the top-rated pokies available for players today.
But I still used a tripod for the toy shots. This is so you can match the angle and perspective of the background shot. Once you have that adjusted correctly on the tripod, you are then free to match your lighting to match the scene light.
Notice how the angle of the camera doesn’t change in the shots above? I just change the position of the model to fit the scene and play with the lighting. (in the background shot, the sun was shining left to right, hence the light falling on the toys from the same direction). Having a tripod allows you to take multiple shots of the same thing, making adjustment to light and positioning but still keep the same camera angle. Final comp is below.
2 – Lights are key
Ask any photographer what the most important thing about taking a photo is and the answer is light. Without decent light your picture, whether its a portrait or of your kids swimming in a pool, will not look great. Now there are many different types of light, light sources and applications. There is natural, ambient light (sunlight), reflective light (bouncing off a window), diffused light (light shinning through a curtain) or strobe/artificial light (studio light/flash). I’ve used all these different types of light for various shot to achieve different results and effects.
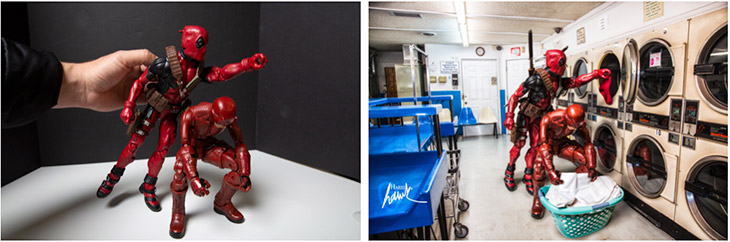
Now I am a professional photographer and I have my own studio lights (Elinchrom D-Lite RX 4) and I have used them for a couple shots. The shot below was in studio to match the lighting of the laundry.
But any light source is achievable, you don’t need to use expensive lights to get the desired result.
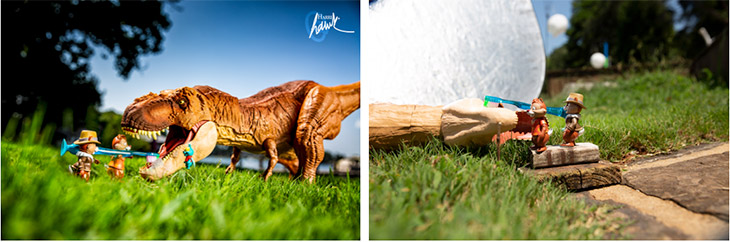
For this Rex-cue Rangers shot below, I used a reflector board. You can see it on the right. You could also use cardboard, tin foil etc, anything that will reflect light into the scene. Being able to add some additional light to a scene (like the reflector above) can really take your image it to a new level.
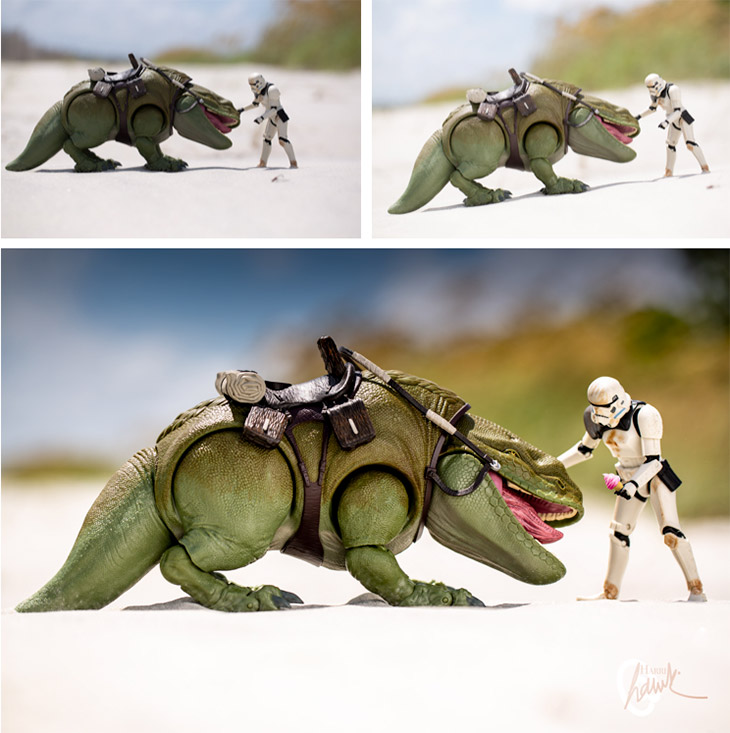
Case in point, below is a shot I did of a sand trooper giving an ice cream to his Dewback. The left shot has some dark tones and doesn’t look very nice, but I bounced some light to the scene and it looks a lot better. (these shots are right out of camera, the 3rd is the final shot).
And finally, diffused light. This when you use something to soften a light source ie: a curtain, sheet etc. It takes way the harsh light and dark shadows and gives a pleasing look to the pic.
In this shot below I used a diffusor (similar to a white sheet) to block out the harshness of the sun light. You can see it in the top left of the frame. It gives a very pleasant soft feel to the pic and evens out the exposure nicely.
And here is the final image after some Photoshop tweaking.
3 – Tethering the camera
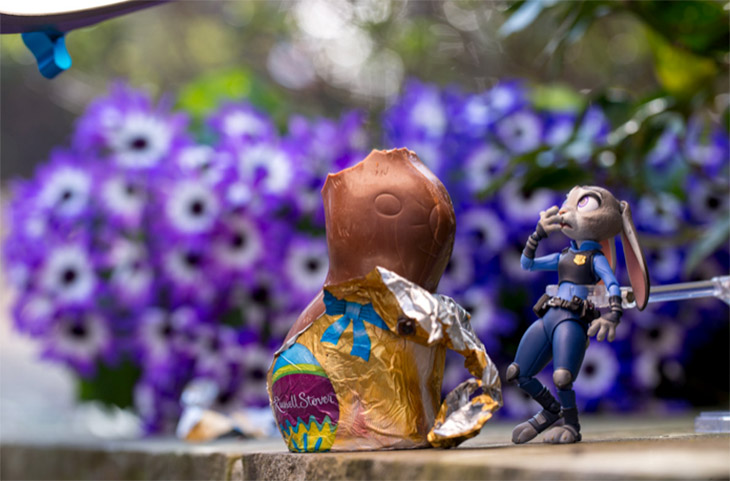
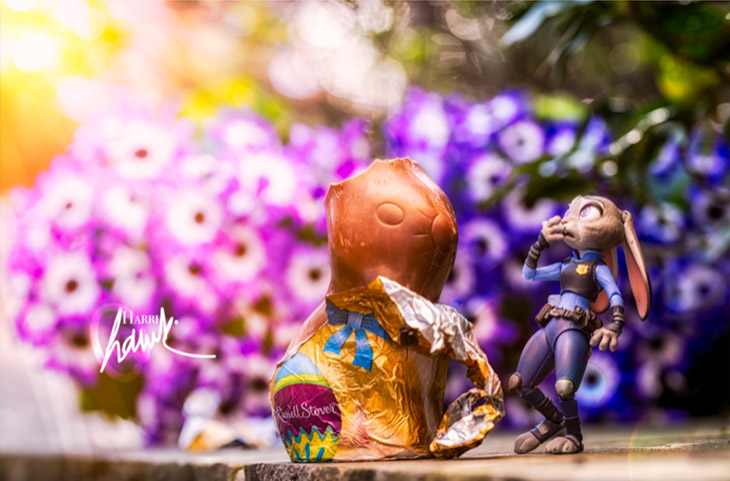
Now this is by no means an essential thing to do. Most toy photographers (amateur to pro) don’t use this method and I use it only when I think it will help my workflow. If you are shooting shots like the easter egg shot above or even some shots that you are going to composite together, you probably won’t need to tether your camera.
It’s an added luxury that I use when I want to see if a certain shot or element will fit into a certain scene. As I said in the BTS video, with some shots, you want to make sure you get the shot right because if you spend hours setting up a shot and think you have it and find when you get to the computer that it’s off, it’s a mission to redo, etc.
It is also a unique process that requires decent processing software and camera equip so it is an added bonus to have if you want but not a necessity.
4 – Use the same focal length for the shots in the scene
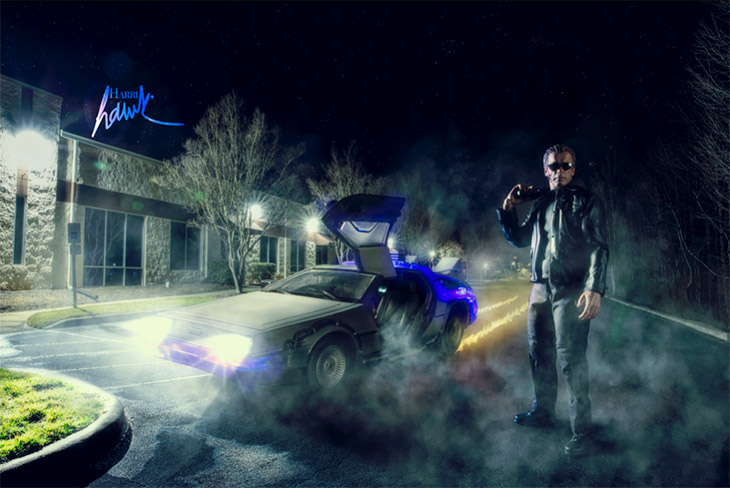
I learned this early on when I started taking toy pictures. If you don’t get a similar focal length when shooting the various objects for your composite, no matter how many photoshop skills and wizardry you may know, the picture will not look right. This is a tough one to explain so let me show you one of my earlier shots where I fell into the trap of using 2 different focal lengths.
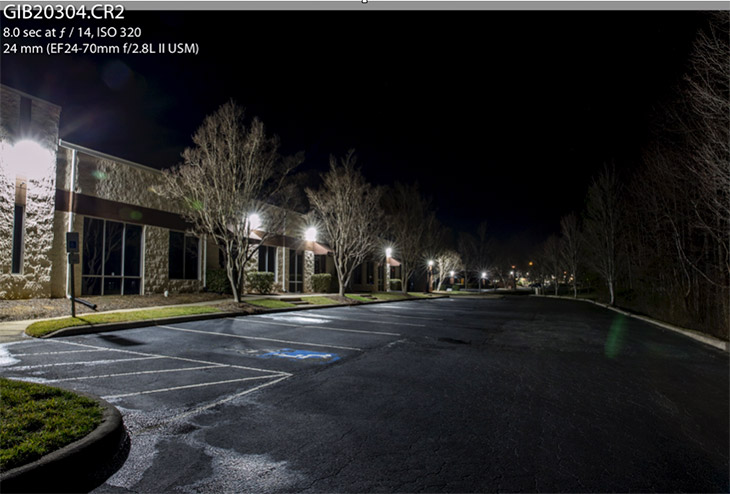
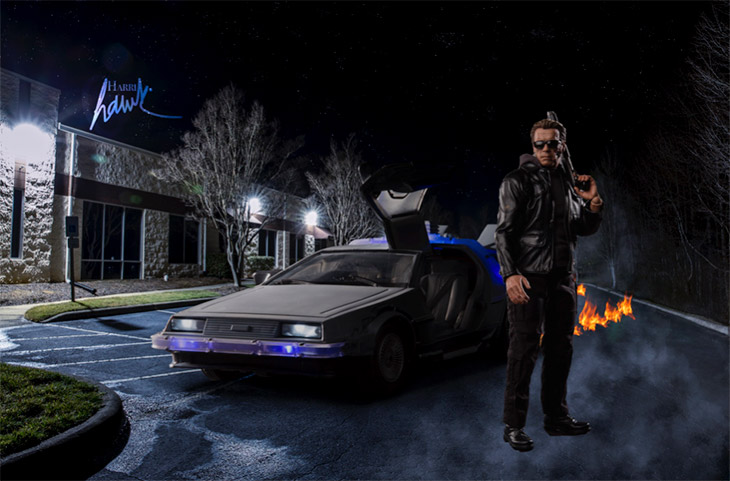
This was a shot I did a while ago called “I’ll be back.. to the future.” The final result came out really well but it took some trial and error to figure out the focal length issue. So if you look at the background shot, I shot that at a wide length, in this case 24mm. (top left information in the below shot)
I then shot the terminator and the Delorean but at different focal lengths 50mm and 68mm.
And when I put them together in the composite, the result just didn’t marry well, visually.
As you can see, the wide angle BG shot, shows the building on the left tapering down in size as you follow it to the back of the shot, where as the delorean, seems to stay the same size as you go to the back wheel. This is because different focal lengths have different effects on perspective. Wider lenses tend to distort and push the background further away, while longer lenses don’t distort and tend to bring the background closer to the front. Going back I took the shots again at a similar focal length, and that made the three elements work a lot better together and allowed me to pull off the illusion in a seamless picture.
Here is a wiki link about how the focal lengths change perspective if you are interested in finding out more.
5 – Choosing the right angle
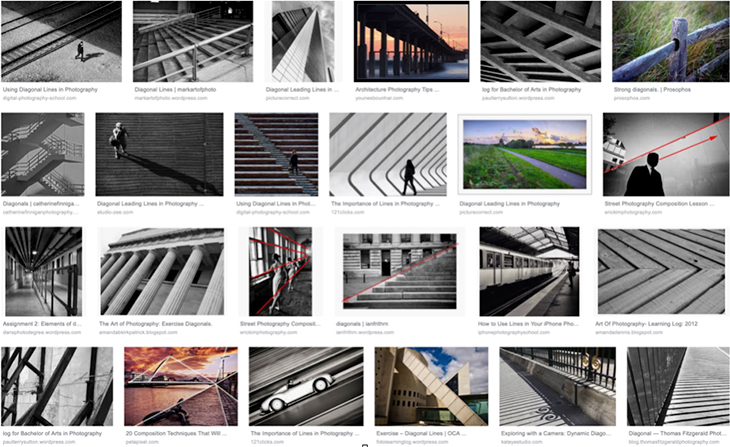
This comes down to preferential choice on the look you want in the shot. If you google “strong diagonals in photography”, you’ll see a lot of images that show you images that have very strong lines and angles in the shot.
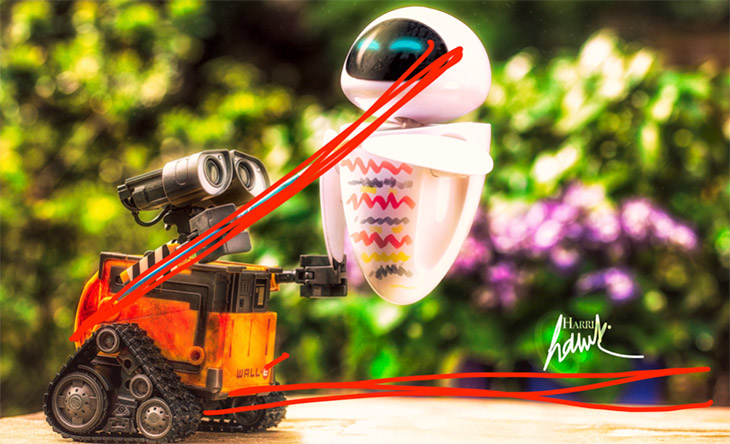
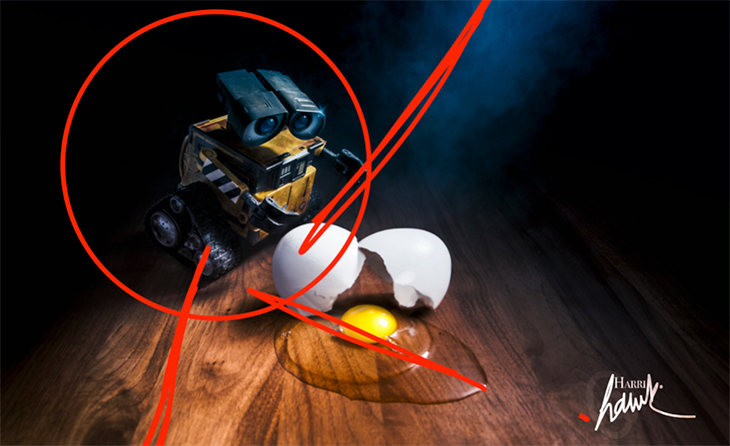
Having an eye for diagonals and shapes in a shot takes a lot time and practice to get good at. It is one of the things that makes an average photo into a good or great photo. Having objects that lead your eye into a shot or direct your attention to something specific in the shot is a great way to direct the viewer into how he or she looks at your photo. Let’s take these two shots I took of Wall•E as an example.
You can see the horizon line along the bottom and the angle of the paint brush in the image above directs the viewers gaze to Wall•E and below, the angle of the smoke, the direction of the grain of wood and the angle of the egg and shell, somehow lead your eye to Wall•e.
As I said though, this is a skill that is learnt over time and with practice.
At the end of the day, this is all about having fun, to create wild and wonderful ideas and see if you can make them become a reality. As I mentioned in the BTS video, I hope I can achieve what I have in my mind… And for me, that’s the whole point of this, to try and push myself to do some creative fun stuff. The goal is to 1: Hone my photography and photoshop skills and 2: stretch my imagination. If I manage to make a few people smile along the way, thats the cherry on top!
Don’t be afraid to try things, ideas, and techniques. There is no right or wrong way of doing this! If you start your journey into toy photographs, I encourage you to send me a link to your work. I want to help everyone out. You can find me on Instagram @Harri.hawk and online on my Harri Hawk Website of Toy Photographs.
When you start editing your video, one big decision you’ll have to make is what editing software to use. Here at Untamed Science, we’ve used a lot of them. The choice depends a lot of the client. The three pro programs are generally AVID, Adobe Premiere, and Final Cut Pro. Avid is used a lot more in hollywood and with large production companies while Premiere and Final Cut tend to be the programs of choice for much of the rest of the industry. Both programs are fairly similar so we thought we would do a quick comparison video of the major differences.
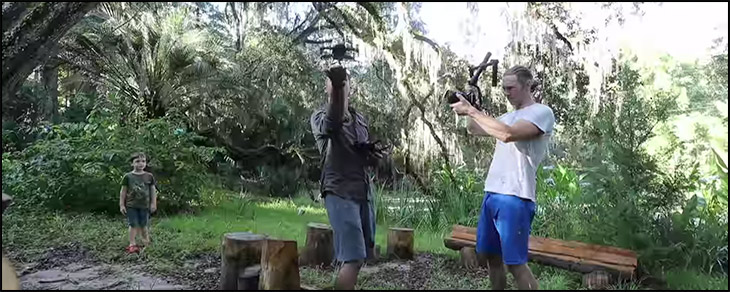
A gimbal is a type of pivoted support system that can control rotation of an object on a single axis. By stabilizing with three gimbals on the X, Y, and Z axis you can effectively stabilize the movement of a camera system. When we talk about stabilizing camera movement using a gimbal, we’re essentially talking about two or three axis gimbal stabilization.
Do you Need A Gimbal?
By no means do you need a gimbal for super steady camera movement. However, it will significantly improve the stabilization of handheld camera movement. We made the following video to hopefully explain the basics of using a gimbal:
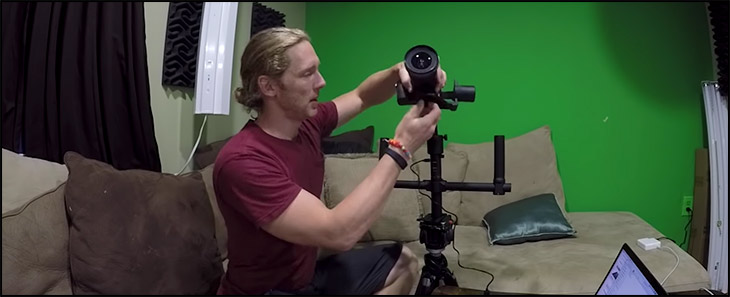
Benefits of a Gimbal
Let’s start with the benefits. Without a doubt, it improves the stabilization of handheld footage. This is the clear benefit. Today’s gimbal like the Moza Air that we were using here is lightweight and affordable. It only takes an hour or two to setup the first time and then is ready to stabilize your footage. It also can serve to replace the need for some gear. If you used a big steadycam in the past, I think you can now leave that at home. In some ways you can get the same type of shots that a dolly track or cable dolly would have given you at a fraction of the weight.
Negatives of using a Gimbal
Time and weight is also the real negative. Every bit of filmmaking gear you bring with you on location is going to mean time. It takes time to set these things up and can quickly fill your check luggage. I’m on the fence whether I’d even recommend something like this for a travel vlogger. A lot of it depends on how stable you want your footage to be.
Check them out:
These are a few of the 3 axis gimbals on the market right now. They are all pretty amazing but we currently think the Moza air may come out on top as the best pick for your money.
In the past, we’ve produced several videos related to macro filmmaking and photography. However, we’ve never found a way to take extreme macro photographs of insect eyes, legs or hair. After visiting Jiri Hulcr at the Forest Entomology Lab, we now have insight into this mind-blowing technique and have broken it down into 5 simple steps.
The 5 Steps to Taking Ultra-Macro Photos
This technique outlines how Jiri and his team take some of the world’s highest resolution and detailed macro photographs. While they wouldn’t claim they’re the best at it, I think the basics of the process are all there for any artist or scientist to take some of the most amazing insect and macro photographs you’ve ever seen. Here are the 5 steps we detailed in the above video.
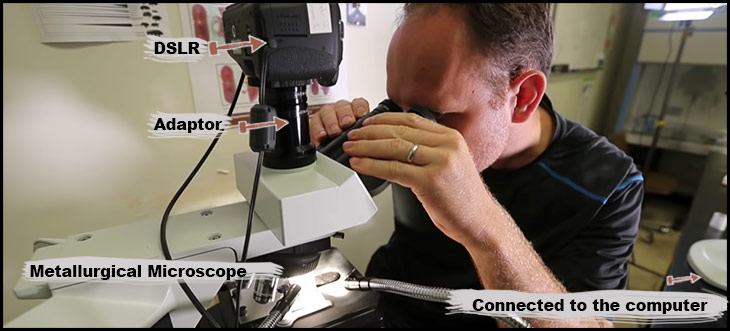
Step 1: Have the Proper Setup
Jiri and Andrew use a few microscopes to take their photos. The most powerful one is the above metallurgical microscope that has a DSLR and DSLR adaptor connected to the computer to allow them to take photographs of the insects. This microscope allows them the have a bit larger distance between the insect and the objectives. This isn’t possible with traditional microscopes.
The next big step is having a solid table that won’t shake. They have a marble slab on a heavy wooden desk with rubber legs to prevent shake.
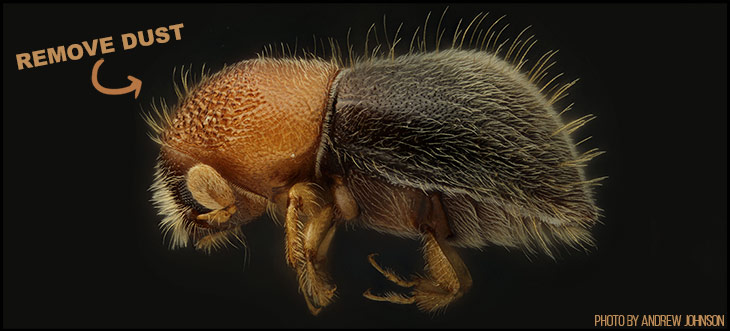
Step 2: Prepping the Specimen
Jiri told me that he thinks this is the biggest and most important step. Small flecks of dust, as he explains, can completely ruin the image of a specimen. Andrew even told me that at times he’ll spend upwards of half and hour prepping each insect. This is done either by dabbing each one off with a paper soaked in ethanol or by carefully adding some white elmer’s glue and then pulling it off once it’s slightly dry.
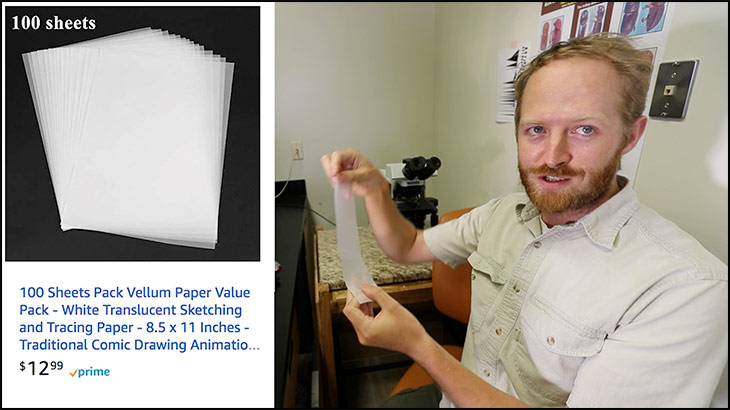
Step 3: Lights and Diffusion
The next big ingredient is making sure the light comes in as diffuse as possible. They do this by adding Vellum around the subject. This is the material you’d buy as tracing paper or to make wedding invitations with. Sometimes they’ll add two circular rings of this diffusion material to make the light spread out as much as possible.
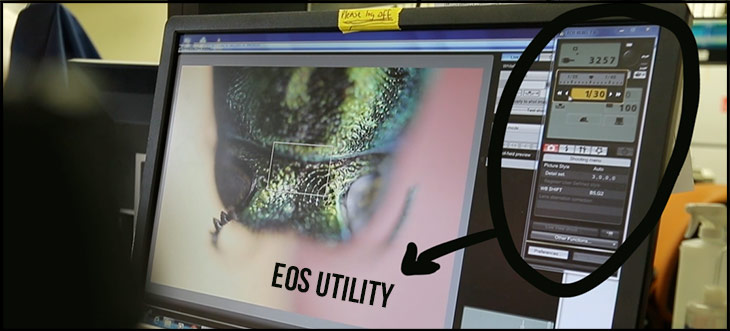
Step 4: Take the Photos
Believe it or not, but this is the simplest step. It doesn’t matter how you take the photos. They use canon’s built in EOS Utility on the computer to snap the photos. The real key is to snap a photo, move the focus slightly and snap another. For small insects of around 1mm they may take about 70 photos and then proceed to stack them together.
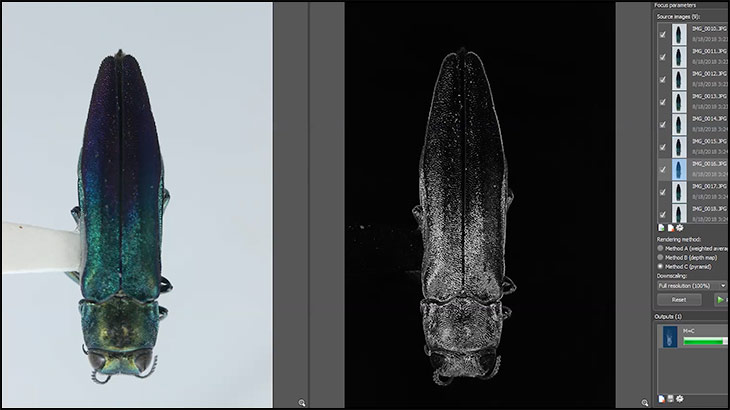
Step 5: Stack the Macro Shots
The stacking process is also pretty simple. You can purchase Helicon Focus (about 30 USD), drop the photos in, and click a single button to let it stack them together. In less than a minute you’ll have a completely stacked image, ready to play with!
Learning More Macro?
If you’re interested in doing macro with larger insects, I recommend watching this video we made earlier in the year where we teamed up with Phil Torres and then took a 100mm macro lens into the jungles of Panama. It shows the capabilities of a field setup and how you might go about constructing it yourself.
If you found any of this useful, might we note that it’s all made possible by small donations from our amazing patrons. See more about what we’re doing for science education and SciComm here.
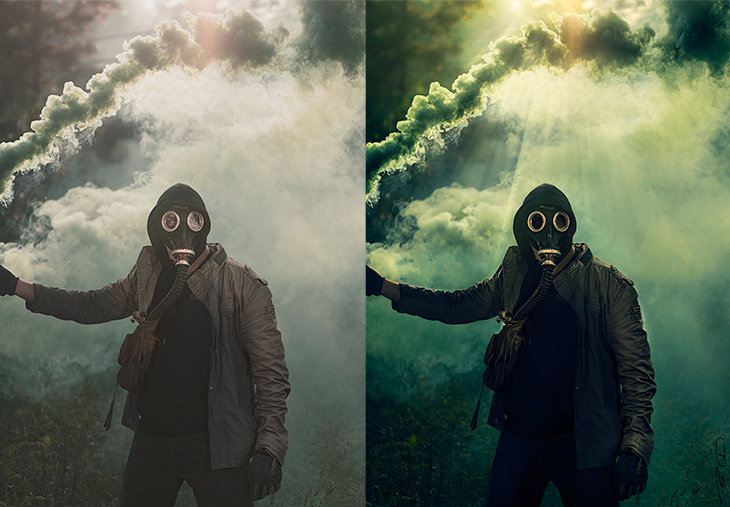
I wanted to offer a few suggestions when it comes to smoke grenade photography. Because we make videos, I think a quick glance at this video will get you up to speed the quickest.
For all of the information that I couldn’t fit in the video, I included it here in the rest of this article.
Location
The location of your smoke photography is important. However, I don’t think you necessarily need an epic backdrop if you’re going to smoke up your background. If you’re going to use the smoke as an addition to your shot, you’ll still need a great setting. Here are a couple major things to consider:
Light: We chose a location here at sunset where the light of the sun was just peaking through a tiny opening in the trees. This made for a spectacular backlight.
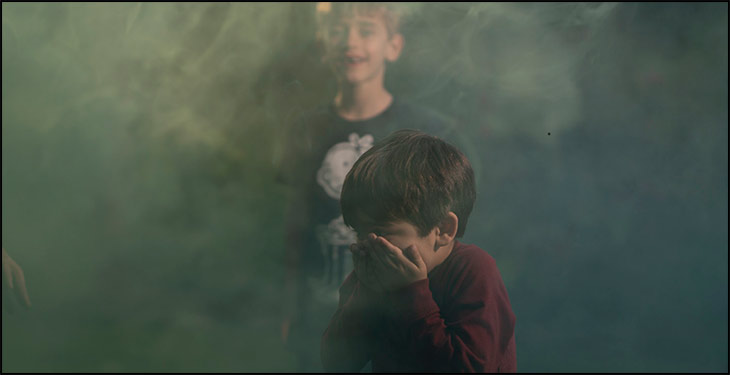
Wind: You need a spot where there is little to no wind. If the wind is blowing it should be in the face of the talent so that it trails off behind them. You don’t want to smoke up the subject before they even get started. Too much wind is also bad as it blows all the smoke away. Notice how ridiculous the below shot looks with smoke between us and the camera. You can hardly tell what’s going on!
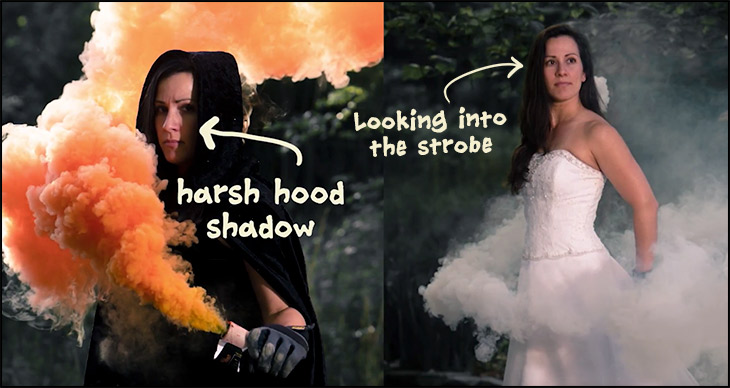
Strobes
The strobes will help light up the subject’s face. If you’re shooting in bright daylight, your strobes will probably have to be extremely bright. Serge was using the Flashpoint strobes at about a 45 degree angle to the subject and in-front of them.
We made sure to mostly look into the strobe as this gave the best shadows.
Serge gave me a full explanation as to why this strobe is amazing.
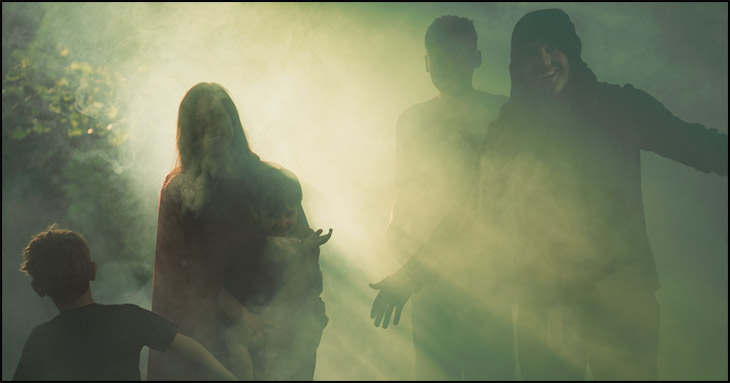
Props
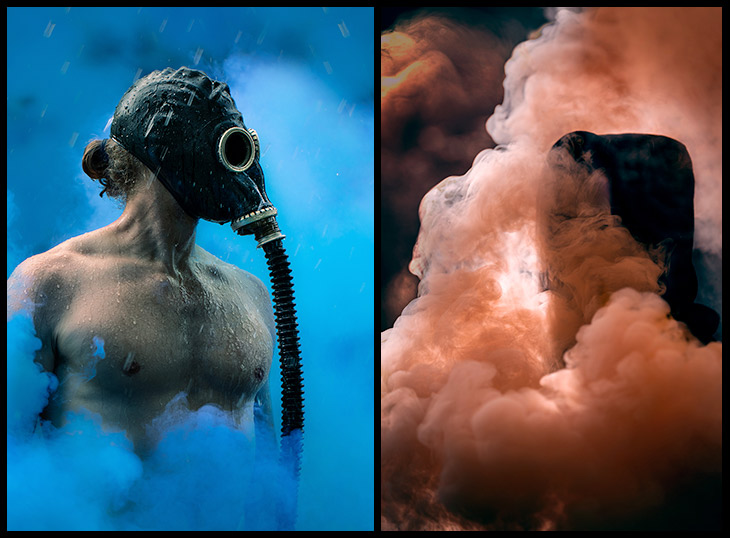
I can’t emphasize this enough – you need props. Here is an example of a shot I did with Mike, who was dressed up in his world war II outfit. The smoke really adds an element to an already cool shot.
If you’re using the smoke as the main ingredient, it might not work out that well. Here is the soviet style gas mask I purchased on amazon. Can’t recommend it enough.
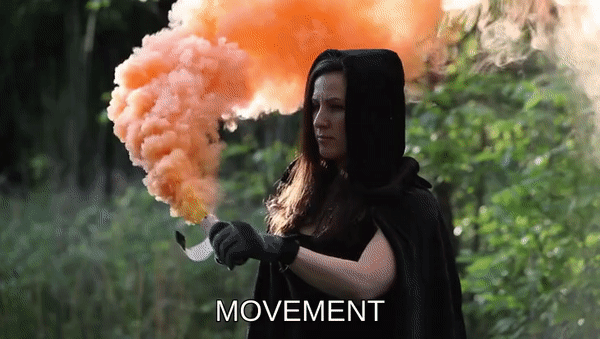
Smoke Grenade Movement
Haley shows what makes for some great smoke movement.
The keys are:
Make sure the wind is in your face, but very light
Smoke up the background
Then turn to camera and SLOWLY move the smoke in front of you
Getting Creative in Photoshop
The great thing about shooting with smoke is that you can play a lot with the colors and intensity in photoshop. Take this flat shot from the original and then my subsequent post-processing on it.
Purchasing Smoke Grenades
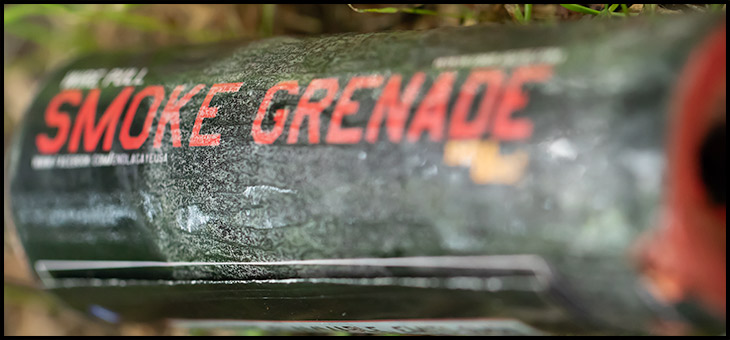
We bought our smoke grenades off ebay, but found that the ones from enola gay are fantastic. You’ll probably pay anywhere from 8-10 dollars for each, depending where you get them. The best way is to do a search for “smoke grenades enola gay” or “wire pull smoke grenades.”
Make your own
While we have yet to do this, it is totally possible. In fact, here is a great video showing how you might do it.
Some Safety
Smoke is not good to breathe
I leaned this lesson in two ways. First, I put my kids in a photograph and thought it’d be a good idea to get them in a smokey background. It didn’t turn out well. Secondly, I wore a gas mask without the actual filter attached. That meant all the smoke sucked up into my mask, making it really hard to breath and see!
The ignition can be dangerous
I’m not exactly sure what the mechanism is for these pull grenades, but it sends off a spark that if it would have hit someone in the eye, would have been really bad!
I found that holding the very end of the smoke grenade was ok, even without gloves. However, the other end gets very hot! That means you should make sure the talent knows not to touch that end to any clothing or to themselves.
It stains clothing
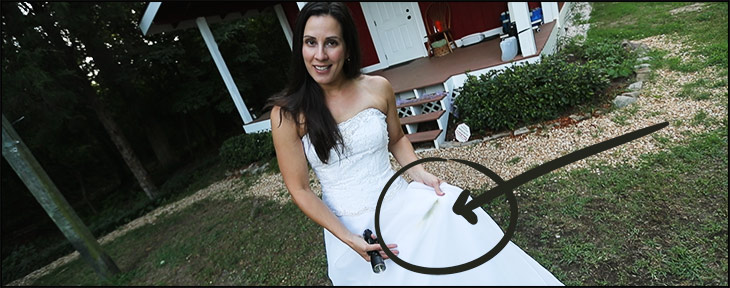
Haley happened to wear her wedding dress to make one of these photos. The photo itself turned out great, but we managed to permanently stain the dress.
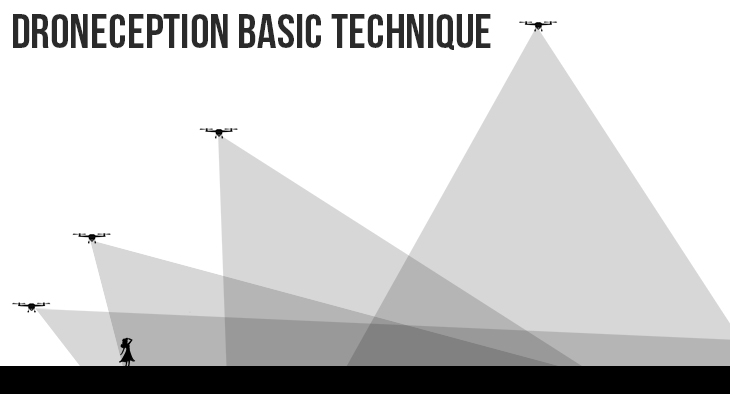
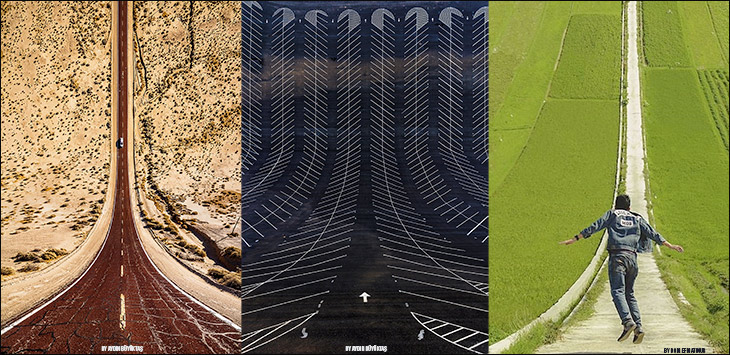
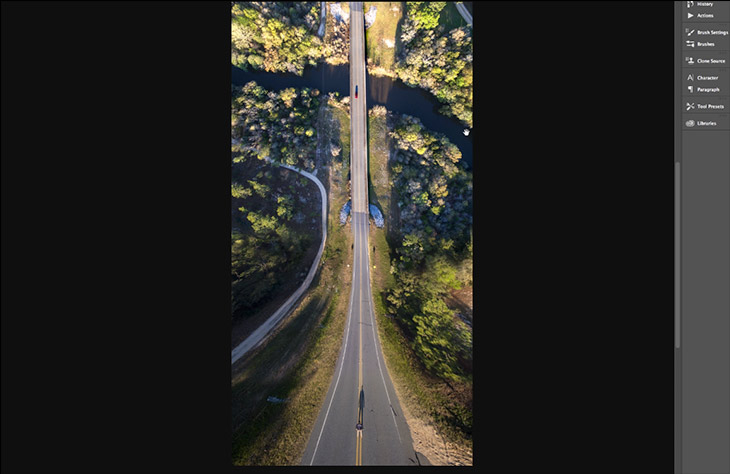
Today, we have a really fun technique to show you – a photo-manipulation technique often known as ‘Droneception‘. It looks something like this.
Here is a review of the main bits.
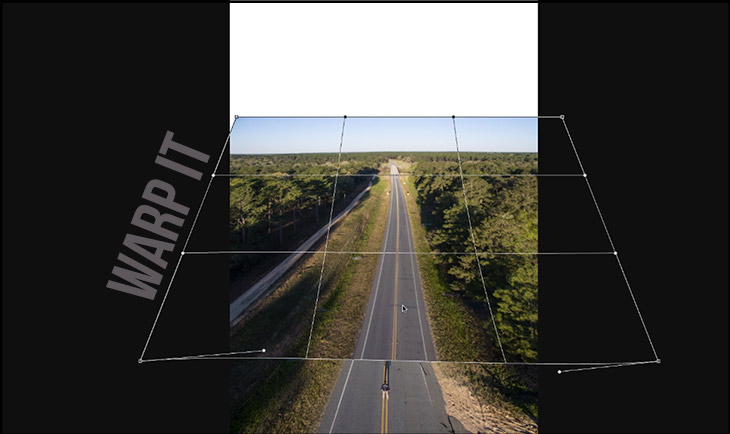
Shoot it Properly
When you’re in the field you need to have the right technique. The first time I shot it, I will admit, I got it completely wrong. The drone doesn’t just move up and down. You have to shoot it in an arc, starting from low and behind your subject and rising up to a straight down position over something in the distance. You’ll blend the images along the way to create this curved image.
You need to take a minimum of two shots, but 3-5 good shots generally make for a better curved image. The above images show roughly how you might create this shot. Here are a few notes to keep in mind.
The first shot is a tad easier to work with if it’s not too low. It’s nice to the see the road extending into the distance instead of getting covered up by a person.
The last shot should be as close to down as possible. This helps give the road that curved look.
Avoid heavily wooded environments as it makes it difficult to cut out the trunks and blend it properly. However, wide roads in the forest tend to work fine as seen in our video example.
You can take as many images as you want, but 3-5 good shots is probably all you’ll really need.
Composition
There are so many ways to make a good droneception shot. If you do a good search, you’d probably come across images like these…
Notice how they use the leading lines to give the image depth and curve. Without them it’s hard to sell the effect. That means you have to choose the right location. It can be exceedingly difficult at times, but when you find one, you’s a really fun to merge them together in Photoshop.
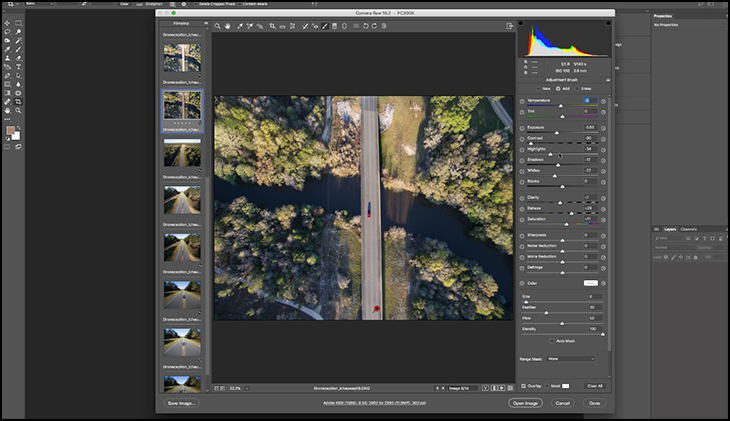
Step 1: Import the images and adjust in Camera Raw
Doing minor adjustments here often makes it easier when you start working with them. Don’t worry though, you can always adjust the brightness, colors and intensity of them afterwards.
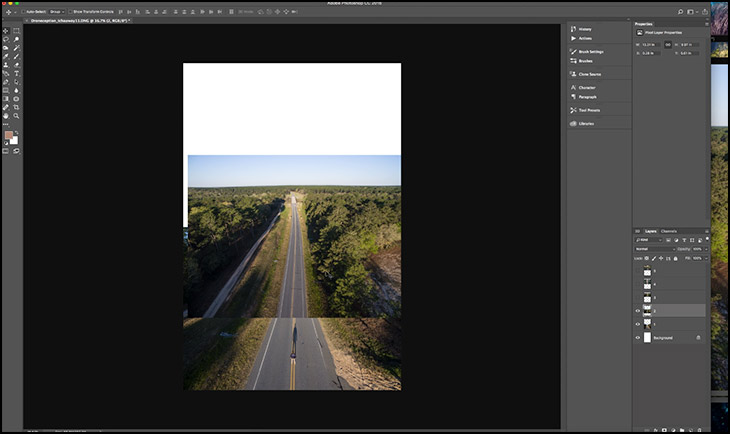
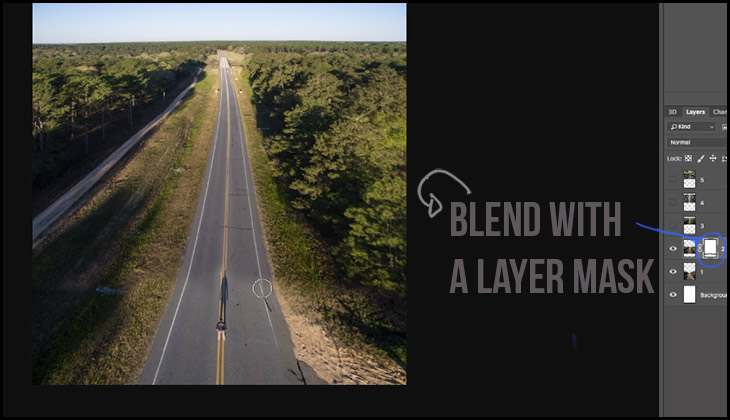
Step 2: Start with one image and layer up
Start by adding the different images into one document. Then start with the bottom image and blend each image on top of it.
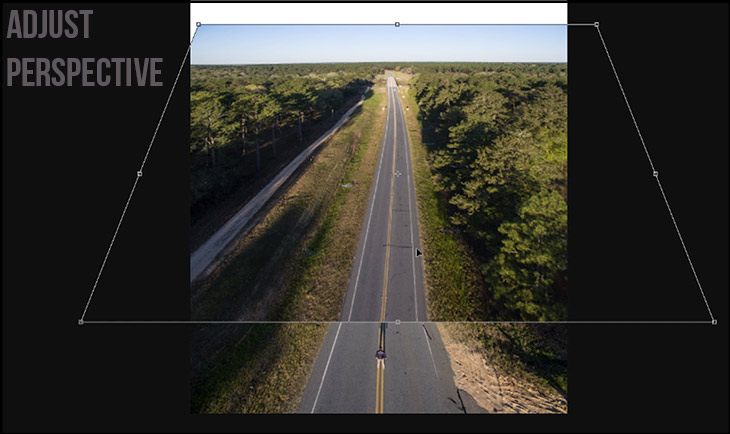
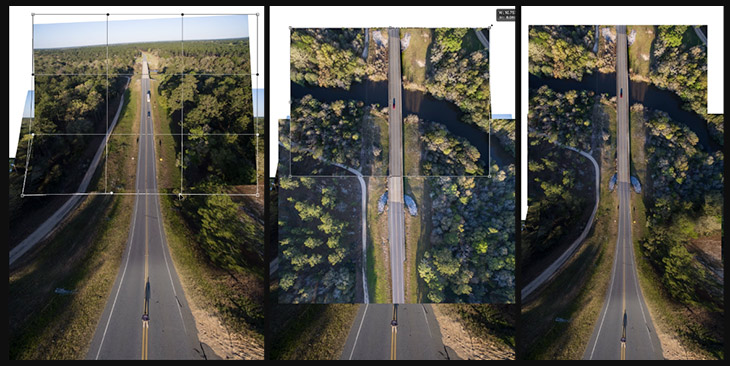
The first image’s perspective can be adjusted by right-clicking on the image and choosing [perspective].
Once the perspective is where you want, right-click and choose [warp]. This will allow you to start the curving process in the image.
The number of images you choose depends on your artistic taste. In this example we used 4 shots.
That is the basic technique used to create these images. I will note that there is a lot of skill involved in creating the best images. We are by no means the experts. The more you practice, you’ll get better. If you take a few shots, let us know in the comments to the youtube video above. We love seeing what all of you are up to. It actually helps us a lot.
Also, I wanted to give a big shoutout to the amazing patrons who helped make all of this possible. In particular, Tobias Haase, Morgan Price, Jinyuan Yeong, James Brady, Please Stand By and Larry Nelson.
Though we may be tempted at times, we can’t shoot down overhead screaming jets or flocks of honking geese. We have to accept those elements as simply part of the “ambient” audio or natural sounds at some locations. So your first challenge is identifying what sounds you want to capture and which ones you want to minimize. Those are usually broken down into two main categories – man-made, and natural audio.
For instance, if you’re filming the spring courting rituals of sandhill cranes in an isolated marsh, you’ll want to capture their natural sounds of their flute-like calls, the flapping of their wings, and the stomping of their large feet. Other natural sounds that you might not want to overpower the cranes could be wind whipping the cattails, insects buzzing around you and your camera, and a pesky red squirrel scolding you from some nearby brush. To “mitigate” those sounds, you might place your directional shotgun mic in front of your camera by several feet to rid yourself of the bugs. A quality windsock over your mic will take care of those gusty breeze sounds, and a couple of tossed sticks or a pile of peanuts should silence the red squirrel. It’s up to you to decide what mix of natural audio you want to capture that will help tell your story.
Now let’s consider the man-made audio. Although it’s supposed to be quiet in an isolated marsh, the reality of overhead jets, distant farm machinery, dirt bikers on wilderness trails, camera noise, your crew whispering, can all conspire to pollute the pristine sounds of your cranes. We can’t use sticks and peanuts to quell all those sounds. Yet we still have some control over mitigating them. We can wait for the jets to pass or the farmer to take a break. Or, we might get more aggressive by going and explaining to the farmer or dirt bikers and other man-made sources of unwanted audio, that we’re filming cranes and we’d really appreciate a period of quiet. Some people will look at you like you’re nuts, while many will appreciate your challenge and work with you. If you ask politely with respect for other people’s activities, you might be surprised what you can achieve. We typically try to hush unwanted man-made noises in the form of chainsaws, lawnmowers, vehicles, PA systems, talking people, radios, copy machines, and cell phones.
If your film includes expert interviews, you may actually need to record man-made audio – which is the spoken voice of your expert. This is when you may want to minimize both natural ambient audio and other man-made audio. Fortunately, wireless lavaliere microphones are small dynamic mics that primarily capture the audio in close proximity to the microphone. So when it’s placed near a person’s mouth, usually on their clothing lapel, (that’s why it’s also commonly called a “lapel mic”) it mostly picks up their spoken audio and minimizes any audio in the distance. This video shows a few ways to mount that lavalier microphone.
But don’t rely entirely on your lavaliere microphone to only capture the clean voice of your expert while filtering out background noise. Again, take control of your shooting environment. If you’re doing science stuff, you’ll quickly find that most science labs are awash in various distracting audio that threaten to rob the words of your talent. Although you can’t hush all the devices inside a science lab, here is a hit list of some ambient noisemakers that you may be able to turn off, deactivate, move off location, or stuff a rag in to:
Humming fluorescent lights
Air conditioning or heating systems (adjust thermostat)
Running water, bubbler pumps
Radios or and music sources – (common in labs and some work places)
People in conversation – politely explain the situation and ask them to be quiet or leave the area.
Copy machines, lab machines, phones, office and lab devices that make noise – turn off, unhook, shut doors.
Now that you’ve taken control of the audio in your shooting environment within practical limits, it’s time to turn your trained production eyes to the visual part of your shoot.