DSLR Basics

We’re always flattered when people come up to ask for help with their cameras. Not only does it happen in the field, but also via online comments through our videos. While we’re all learning, we know enough to get you beyond the basics.

The step up to a DSLR (Digital SLR) camera and the chance to take professional quality pictures is no longer ridiculously expensive. Even the cheaper DSLRs have the power to capture photos that can end up as a framed canvas on your wall.

Truth be told, there is a learning curve. Yet, these things aren’t that complicated either. As a beginner we think there are three components to your camera that you need to understand in order to get started with any DSLR camera.

1. Aperture
2. Shutter Speed
3. ISO

We tried to do our best to explain these in this short and simple video.
Good luck with you new future as a master photographer!

Cattle and Bird Conservation

Who would have thought that you could conserve endangered grassland birds by supporting and encouraging ranching activities. WWF is teaming up with ranchers of the northern great plains to do just that. This short produced by Day’s Edge Productions tells this simple story.

I think the rancher said it best – “Whats good for a duck is good for deer, is good for a cow.”

grouse

How to Make a Hyperlapse

A hyperlapse is a great effect to add into your films, if you want to know how to make a hyperlapse like this one, check out our tutorial below.

A hyperlapse is a form of moving time-lapse where you slowly move the camera along a path while taking photos in a sequence. You can later stitch these photos together into a movie whereby they move. Jonas and I have been doing this for awhile now and while it’s a time-consuming task, it is not difficult. We wanted to share the technique with you quickly in this short tutorial.

Here is a little trick for keeping your hyperlapse straight

Important Advice for Newbies

I know you’re thinking this is a pretty bold title. I mean “THE” most important thing? There are so many things that make the filmmaker, how could we narrow it down to one as the most important!

film-in-fish-store-2

If you’re an up and coming science filmmaker or you’re already working in the industry there is one thing that you need to do all the time. And no, it has nothing to do with keeping up with the latest gear, going to film festivals or even marketing yourself online. In fact, it doesn’t even matter what role you play in the industry – from researcher, to camera operator, to producer. It’s something you can do well early on, and let it carry you far into your carrier but you’ll never be able to completely give up working on it. It’s all about building your reputation.

Build your reputation

Let’s face it, science and natural history filmmakers make up a pretty small niche in the world. There are not many of us that dedicate our lives to making films about science and the world around us. What that means is that you’re going to build a reputation in the industry and (let’s be honest) you want it to be good.

Before we go on though, know that your reputation isn’t entirely about how good of a film you can make. While that’s part of it, few of us can make a living sitting solo in a blind in Africa filming wildlife all day. That means we’re working on a day to day basis with lots of other co-workers and sometimes more importantly clients willing to pay us for what we do. That’s why I’m skipping the act of making good films as part of “building your reputation.” That’s a given, but it’s only part of it.

I was inspired to write this after reading a similar article entitled “The most important thing you can do to build a successful career in the film industry“. While we both agree that the best thing you can do is build a reputation, the film industry is so much different than that of science filmmakers that I thought I’d make my own points.

Make sure the glass is always half full!

When you’re on location shooting a documentary, you’re living in pretty tight quarters with a small number of people. Nobody likes a downer, and boy, can it really bring everyone down if you have someone that constantly complains. Maybe they’re complaining that the equipment supplied is sub-par or that the light just isn’t good at the moment. Maybe it’s something we can fix but often it’s just complaining to complain. I’m here to tell you as someone who hires crews to go on location with me, that I hate that. We’re all in this together and if you complain on a shoot, in the end it makes me feel terrible. And since I’m the one hiring, I’m not going to hire you again.

happy filmmaker

That’s why I suggest always coming into a shoot with a positive attitude. If it’s easier, think that your job is to make the next guy’s job easier. Always encourage your fellow crew members and be positive.

This advice goes for editors too. If you’re an editor and you complain to the producer that they did a terrible job with the audio or the white balance you are being a downer. Chances are the field crew was doing the best they could in the moment. Your job is to make us all feel better in the edit and if you do so in a happy manner, we’re all going to want to work with you again!

Present Yourself Well

two guys in leather and camo

Know that how you present yourself is very important to your reputation. I put this little picture in because it explains my point well. We were on location at Hazen’s house when he said he was going to bring a girl back to meet the crew. Of course, I thought it’d be funny to give a really bad first impression – as a joke of course. So Jonas and I pulled out a few choice items from our prop closet. Unfortunately I couldn’t hold character. But, if you’re on a set, your character is partly determined by how you present yourself.

The reason this is important is that we tend to all work with clients from time to time – the ones paying the bills. The clients work with the producer – in many cases that’s my role. In turn, I hire the crew. I want everyone on our crew to give a good impression when the clients are out watching what goes on. While I don’t want everyone to dress up all the time, the better you present to the clients, the better it makes me look, and the more likely I’m going to hire you again.

Anticipate

Big-Island--162

The least of your worries is anticipating the flow of lava, but I use this picture we took because it does help me explain this better. That’s me in the picture by the way. Filming a lava flow is a lot like working on location with a crew. The lava isn’t a fast beast. It moves slowly. You can look at the entire flow and set yourself up for shots. However, you need to look at the entire flow from time to time and make darn sure you’re not getting surrounded and trapped by the lava.

In the real world, you need to anticipate the needs of others and be the lending hand that makes everyone really enjoy that you’re there. You can anticipate what notes the client is going to have in the edit when you deliver the film. Make the changes before they have to suggest them. You can anticipate the batteries the cameraman is going to need and hand it to him before he even asks. In the end, the more you anticipate and solve little problems, the less problems there will be and everyone will be pretty happy.

Don’t talk Badly about your Last Job

filmming-in-the-desert

Chances are we’ve all hung out with people who like to tell you how terrible their last job was. Now I’m not talking about telling funny stories from shoots. I’m talking about those that like to complain about how terrible X, Y, or Z was on the last production. The problem I see here is that when I hear these diatribes, I can only imagine that they’ll be talking about this current shoot in the same way. This is especially the case if they never have anything good to say about past shoots. I hate the idea that people are talking badly behind other’s backs and this fits into that category. While you could feel that this sort of talk is a good way to build you up, it really only cuts away at your positive reputation.

Have a Great Work Ethic

film-in-fish-store

This may go without saying but show up early, work hard and just have a great work ethic. People tend to get frustrated on a shoot if they think they’re doing more work than others. The best way to solve that is to put in just as much work as everyone else. Your colleagues will see it and feel that you’re respecting them too!

Take Critics of Your Films Graciously

I add this in there because we’re all the business of making short videos. It’s a great thing to ask your peers what others think of your films. While it’s great to get compliments, it’s really the best for you if you get honest feedback. Yet, the only way you can get good, honest feedback is if you graciously accept what others tell you. Don’t instantly get offensive and explain everything.

One of the more annoying things I’ve encountered is when I’m asked to look at someones film and give some constructive criticism only to be greeted with angst. I’m trying to help by giving some feedback. I’ve been doing this a long time after all. The best thing you can do if you’re recieving the feedback is to thank the person for taking the time to look at your film and tell them that all of your comments are noted and appreciated.

If it’s your film, you’re looking for general trends in the feedback. Just don’t burn the peers that are so graciously looking at your clips. The same advice goes for Youtube. Take the comments with a grain of salt, but realize that if a majority of people say you’re an idiot, make the next film less idiotic.

filmming-treecutter-ants

So there you have it, a few tips on building a good reputation. I know there are lot more things that can help you out in this industry, but this is one of the most important things I can think of. For the rest of the advice, maybe you can just turn to our new book – coming out this fall!

We have a new book – Making Science Films!

Amazon link to how to make wildlife films

Cameras and Gear for Expeditions

If you’re a seasoned filmmaker you probably have a kit that you bring with you on location. It works for you, and you know exactly where everything is. However, if you’re new to photography and filmmaking, deciding what to bring on an expedition can be a daunting task. I want to start by introducing you to the very basic kit that you’ll need to bring with you. Then we can expand from there, depending on your trip needs.

Now that we’ve laid out what we bring, let’s expand that to what we took on a 12-day expedition in the Grand Canyon. You’ll be able to see what things you may need in these remote conditions with little ability to recharge batteries (solar recharging wasn’t an option), in a harsh environment, yet requiring minimal setup.

kayaker taking photos in grand canyon

Check out this short trailer from the trip, then read on about the equipment we used.

The Camera

Jonas and I each brought with us our Canon 5D Mark II/III. I highly recommend DSLR cameras as they double as both a still camera and a video camera…and take amazing photos like this:

Paddling the Grand Canyon - light painting

Granted, these two cameras are in the 2-3K dollar range. If you’re trying to cut costs, I’d recommend the Canon 70D. It is one tier lower than the the Canon 5D but has some amazing improvements, such as a flip screen that will allow you to film yourself. Plus, it’s only about 1K!

Lenses

Lenses are key to making an awesome film with a DSLR. However, the most important thing is to cover your entire zoom range. If you have a kit lens, bring that. Our lenses for this particular field shoot included the following:

Lenses for field shooting

Batteries

When I went on expeditions in the past I would worry about how to charge everything. With these DSLR cameras though, you can simply buy a ton of off-brand batteries. (Our friend Neil Losin, who did a similarly long expedition, sent us 20 batteries to pack and use. Thanks Neil!) You can get them on Amazon for about $15 each.  In total, we took with us 25 batteries for 12 days. With time-lapses, we ended up using 22 of them. They don’t last forever, but they’re not bad!

Audio Gear

I brought two pieces of audio gear. The main one was the Rode Videomic Pro. We also brought a wireless mic setup, but we probably wouldn’t bring it again. It was hard to get people wired up, so we didn’t use it that much. We just filmed our subjects close up, enough to get the Rode mic to pic it up.

Time-lapses

Don’t forget to bring an intervalometer to shoot amazing time lapses. Here is a little short I did in the canyon describing my method.

Jonas Stenstrom light painting untamed science

Extra Gear

There are a few extra things I brought, that  really took the production value to the next level.

  1. A tripod: I used this one, with a pistol grip!
  2. A slider: A two foot slider like this Rhino slider works awesome!
  3. A GoPro: Jonas shot a lot of his canyon film here, with a GoPro.
  4. A Waterproof Bag: I preferred the Watershed Ocoee bags.

I hope this helps as you plan a filmmaking expedition. Here is a second, “what’s in your bag” video showing our 2016 field setup. Leave us a comment if we left anything vital out!


Brainstorming and Initial Plans

As you’ll discover, filmmaking is very much a creative endeavor, and one of the many beauties about the process is that there are no rigid guidelines. No two filmmakers will produce the same film about the same topic in exactly the same way. You are free to unleash your creativity and design any blend of elements to fulfill your filmmaking passion and to reach your audience. However, almost all filmmakers will agree that without following a clear plan, you and your film might come across as a jumbled mess of ideas.

If you want the film to impact your audience, you will need a plan designed for that audience and a clear vision of how you are going to show and tell your story. When you tell an audience what to think by presenting a series of facts and evidence, you may fail to engage them and inhibit them to think for themselves. However, if you show your audience a sequence of images accompanied by graphics and a catchy soundtrack, but leave out the facts, you run the risk of losing your message altogether. A carefully planned design can both show and tell your film’s story. Your plan should blend creative genius with a practical approach to effectively reach your audience.

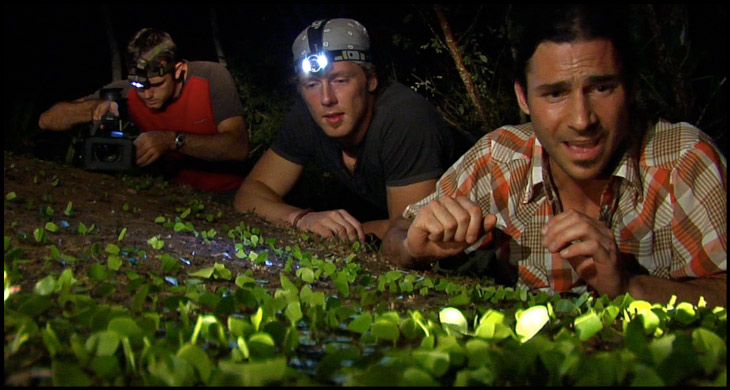
To demonstrate how you can achieve the type of film that will show and tell your message, let’s walk through a typical pre-production meeting at Untamed Science.

Start by laying some groundwork. Ask the following foundational questions of any filmmaking adventure:

  • What are the goals of the film?
  • Who is the target audience?
  • What is the story?
  • What is the take-home message?
  • What distribution methods will we use?
  • What are the production roles?

Your plan doesn’t have to be an elaborate document; an outline works fine. However, the more details you include up front, the more clearly you define the vision of your production.

Choosing a Topic and Defining Your Goals

First, define the goals of your film. This will help make you aware of the information that you need to gather and the pertinent facts you need to tell your audience. Make a list or, better yet, have your production team brainstorm together. Once you have a list, pare it down to three or four complementary (and realistic) goals. Here are some examples:

for a Wildlife or Natural History Documentary

  • Make the audience aware of a species in peril.
  • Make them care enough about the species to take action.
  • Identify causes that harm the species.
  • Inspire social change to end harmful causes.

for a Science Film

  • Connect a science topic with a problem in the audience’s lives.
  • Reveal how science offers solutions.
  • Explore how the audience can become part of solution.
  • Change the audience’s stereotype or perception of the topic.

Your goals may be something that you come up with or something that a client brings you. One of our clients, for example, simply wanted to save the Florida manatees. Your job as a filmmaker is plan a film that will do that most effectively. But who are you making the film for?

Identify Your Target Audience

Your target audience is the group of people you want to watch your film. It can be as broad as the general population or as specific as the members of the Denver Geophysical Society. Knowing your target audience will help you plan the key elements of the story and relevant production techniques.

Armed with our defined goal to save the manatees, we would brainstorm with our production team to identify the potential audience. In this case, our audience might include:

  • Florida boating and fishing associations
  • Drainage commissions and engineers
  • Florida travel and tourism
  • Florida fish and wildlife officials
  • Coastal residents near manatee habitats
  • Nature and outdoor associations
  • Students in the area

Though we ideally want the entire country to know about and help save the manatees, our target audience should be people who are impacted by our story and who have the most influence to help save them. Perhaps we concentrate our efforts on Floridians in the age range of 16 to 29, a group that may not even notice the plight of the manatee until we bring it to their attention. Next we would define our story, gather information, ask our “big questions,” and produce our “take-home message.”

Defining Your Story

Next we outline the elements we might want in our story. Jot down whatever comes to mind, but try to think from the perspective of your target audience. Then arrange your ideas as key questions in an order that would create a logical development for a film, for example:

  • What’s a manatee, and why are they unique?
  • What’s happening with manatees today?
  • What things are threatening them?
  • Who is responsible for harming them? For helping them?
  • What experts or personalities can offer quality content?
  • What can be done to save them?
  • How can the viewer get involved?

This list establishes a clear direction for our film. We can elaborate or refine each question as we gather the materials to answer them. The logical and progressive development of your questions helps refine your grand plan and increases your chances of a successful production.

Develop the Big Question and Take-home Message

To keep our film on track and give it focus, we need to refine “the big question.” What’s the singular most important question that the film should answer for the audience? A logical choice from our example list could be, “What things are threatening [the manatees]?” Identifying the big question helps keep you focused during planning and production. It might be easy to get lost in the excitement of shooting your underwater segments with the manatees or interviewing some Hollywood personality dedicated to saving them, but if you remain true to answering your big question, it will help you keep focus.

Also, by presenting the big question early in your film, it frames the theme for your audience. You might have heard that to answer a question thoroughly, you have to ask several more questions. For instance, asking “What things are threatening them?” will lead you to ask how a manatee survives in the wild, what type of environment they live in, or how they adapt to living in a habitat affected by human intervention. The questions may become more specific: are pollution, changes to their natural ecosystem, or biological deficiencies threatening the manatee? Asking and answering these types of questions will develop a logical flow for your film. The answers also may help lead your audience to make their own conclusions.

Developing the big question can also help your audience anticipate the possible solutions. By summarizing all the facts presented by experts and science content within your film, you empower your audience and give them a sense of ownership in answering the big question for themselves.

You should also develop a clear “take-home message.” From our list, the take-home message might be answering the question, “What can be done to save [the manatees]?” The answer might inspire them to do something about the dilemma portrayed in the film. For example:

  • People have the power and resources to save the manatees.
  • Government and organizations need to join forces to save the manatees.
  • You can help save them with these five simple steps.

From these messages, select the one that is most realistic, concise, and that best matches the biggest segment of your target audience. Now you are ready to consider how your production style can best connect with your audience.

Style

This is also the time to decide on the slant, presentation style, point of view (POV), and feel of your film. In short, you need to determine how you’re going to tell your story. Will the story be narrated, host-driven, expert-driven, or a combination of these? Will the feel be edgy where the camera and POV feel like they are part of the unfolding action or discovery? Or, will it have the more classic feel of a “blue-chip” documentary (such as Planet Earth or Blue Planet)? Establishing how the story will be told early on will help the production team preserve the feel of your film throughout the entire production process—from planning, to shooting, to editing. In our manatee example, we might decide to have an edgy, investigative, documentary style, realistically unfolding the facts to compel the younger audience we have chosen.

Define Length and Methods of Distribution

Though you’re a long way off from distributing your film, identifying exactly how your target audience will view it is an important part of your early plans. It will help you design the style, length, and presentation of your film. For example, if we want to air our manatee film on television or at film festivals, we might consider a 20- to 30-minute format. That gives us a number of options on developing the depth of our content and determines how much information we can present. On the other hand, if we choose to distribute it on a DVD or at formal meetings (to organizations we listed as other possible audiences), we might have the luxury of producing a feature-length production (more than 40 minutes). If we want to make a music video on saving the manatees that we want to go viral on YouTube, then we may want a three-minute format where we dive headlong into the message with fast-paced action and quick cuts between short segments.

Untamed Science has produced hundreds of science education videos that are intended to inspire students in classroom settings. From this experience, we have learned that a five- to six-minute production works most effectively for classroom delivery. Four minutes is not quite enough time to add all the elements to engage, entertain, and inspire a student; and longer videos seem to test attention spans.

Define Production Roles

The final part of your plan is to list the key roles in the production process and consider who might be the most qualified in your production team to assume those roles. You might be talented enough to perform all the roles in making a film: planning, scripting, directing, shooting, hosting, editing, special effects in post-production. But it’s a huge job for a single person! It’s a good idea to spread the filmmaking workload across the ranks of your recruited talent.

Here are the key roles in making a film:

1. Producer
The producer’s job is to assemble the entire crew. Producers are the team-makers. They don’t have to be on location, write the script, or edit anything if they find the right crew. However, in most small documentary productions, the producer is often the scriptwriter and director.

2. Scriptwriter
Scriptwriters may write a treatment (a detailed first draft usually written like a short story) of the film content to present to funding agencies. After funding is approved, the scriptwriter crafts a more detailed outline or script. This gives the director, hosts and camera crew something to reference while making the film.

3. Researcher
A researcher’s role is to do the background checking on a topic to present the best focus for a film’s content. For example, they might find the best sources for supporting our manatee film, list the possible experts, get the facts together, and make sure those elements can actually be shot. They often work with the scriptwriter to check facts and aid the logistics coordinator’s job. Recent graduates with biology degrees often make great researchers.

4. Logistics Coordinator
The logistics person should arrange all of the physical concerns for the busy film crew. They make travel arrangements, contact experts, get location or facility permits, and generally ensure that everything at the location is ready for the shoot.

5. Cameraperson
Good camera operators are worth every penny. They should be able take your shot list and capture everything to show your story through the lens of the camera. Most documentary camerapersons are skilled with lighting setups and may bring a light kit to a shoot. They are responsible for working with the location director and sound person.

6. Sound person
While a skilled cameraperson may also serve as the sound person, most documentaries with a decent budget will have an assigned sound person that knows their stuff. Having poor quality sound can ruin a segment. The sound person will generally carry a mixer and keep all incoming audio sources separated and at the proper levels before they feed the audio signal into the camera.

7. Location Director
The location director is in charge of envisioning and directing each segment. The director will guide the cameraperson and think one step ahead of them. For instance, directors will interview the experts while the cameraperson is getting the shot lined up. In addition, while the cameraperson is shooting manatees in the water, the director may direct the talent to quickly get in the shot and give a quick account of what’s happening. A camera person can only do so much with their eye on the viewfinder, so a director who can think ahead and envision footage before it happens is key to a great shoot.

8. Host
If the style calls for it, the host has a huge role as the main character of the film. His or her voice and actions tell the story. This might mean just having fun. While that sounds easy, it can be difficult to block out the stresses of a production and get into a fun mindset. The host should know the material backward and forward so they can give impromptu responses to the camera. The host should memorize any scripts the production requires. Hosts are the representative face and voice of the film and should take special care with their physical appearance and costumes.

9. Narrator
A professional narrator in a studio should work with the director to produce a quality narrative voice that fits the feel of the film. Professional narrators often have their own studio and can deliver narrative audio online. Also consider the advantages of working in-person with local narrators. Working in person can help to direct the right pacing and inflection in telling the narrative story.

10. Editor
The editor may or may not have been behind the camera or at the shoot location. On site, they will see what story elements were captured through the lens and can quickly assemble the essence of the story in the editing timeline. For some productions, though, editors need to tell the story objectively from the collected footage and not rely on the story as it appeared to the film crew. An editor who was not involved with the shooting may have a more open mind and only create an objective story with the footage that exists. Regardless, the editor should review the footage then work with the director to come up with the compelling story. The editor may also work with animators to come up with graphics that support the production.

11. Animator
Animators are brought in for sections of a production that may need compelling 2D or 3D graphics to tell a portion of the story. Most animators are hired as sub-contractors and work under the direction of the director or editor.

12. Distributor
Distributors are often well-connected within the industry and can be brought in after a production. Ideally, it’s better to work with a distributor before the completion of the film to develop a distribution plan that will build an audience for your film. Despite the potentially helpful role of a distributor, you ultimately have the most at stake in the successful distribution your film, so take an active role in planning the distribution.

Of course, you could probably come up with many other rolls in a production. Where are the grips, PAs, executive producers, musicians, stunt coordinators and the casting directors? Compared to the credits listed in a typical Hollywood film, our list of roles is pretty sparse. Nonetheless, it represents the major roles you will need to fill with talent. How you fill those roles with talented people depends on your budget, and the talent and interest of your friends, classmates, relatives, and fellow filmmakers. Let’s assume that you’re limited on budget and prospective talent pool, and you’ll need to combine some roles. We often combine roles on smaller productions. But make sure to avoid assigning people with roles that may overlap, such as camera person and host. Here are some logical combinations:

  • Producer, scriptwriter, director, sound person
  • Cameraperson, editor, animator
  • Host, narrator, researcher, logistics assistant

In this example, you may only have three people on your crew, but that can be enough to produce your film. To take full advantage of your small crew, be sure to exchange ideas openly and help one another during each phase of production. For instance, the director, host, and cameraperson can all help dress the set or prep the location, work with lighting and audio while collectively offering ideas on how to best shoot a segment. Having the camera person as the editor gives that person the advantage of knowing what shots to get during shooting for the upcoming edit. Later on, the editor will already know the shot inventory that he or she filmed as the camera person. It can make for an effective overlap of roles.

Where to get talented crew?

Chances are that you have already gained some industry contacts that will help you assemble your production crew. If not, and if you will be hiring professionals, you should network with other local production companies for recommendations. If you are unsure about using a person to fill a role on your crew, ask for their demo reels or samples of their work. Hire the most talented crew members you can afford. Saving a few dollars on a cameraperson or editor with limited experience or talent could jeopardize your entire production. On the other hand, if you are on a small budget, you might get creative in building your crew.

Getting a Low-budget Crew

What if your friends, classmates, or relatives don’t have the required talent or interest in filmmaking? You may need to search out and recruit “low-budget” talent for your film. First, let’s make the job easier by further combining roles. If this is your film, you should be able to assume all of the roles except the host and possibly narrator. If you are a good host, you may need to recruit only a cameraperson. (An animator might be one other role you may need to recruit; it depends heavily on the content of your film. Some science topics, such as chemistry, need to be revealed at the molecular level that can’t be captured by the average video camera, so a good animator can make those concepts come alive for the audience. If the topic demands it, add an animator to your recruitment list.)

If you can’t afford to pay talent with hefty fees, consider paying them with a nominal payment for services, end-credit notoriety, experience in filmmaking, services traded (they help you and you help them), product or gear trade, or a creative combination of these.
But where do you find that potential host, cameraperson, and animator? Fortunately, they are often in similar places. Here’s a list of where to begin your talent search:

  • Community college or technical institutes that offer courses in your science topic, filmmaking, media, or acting
  • College graduate programs that cover your science topic, filmmaking, media, acting
  • Local television news stations
  • Local filmmaking or production groups
  • Local theater productions or acting schools

It is pretty amazing what you can accomplish in your search by using the Internet. Craigslist, batch emails, or casting calls can turn up dozens of leads in no time. And don’t forget the timeless telephone cold call. Even if your prospective sources can’t help, many of them will have other names and contacts they will pass along if you ask.

One final note about looking for narrators: if you don’t have a quality host and need to put narrative flair into your film, take the extra time to find a narrator that fits the theme and feel of your film. Online searches will give you dozens to choose from and many of these sources will allow you to listen to samples of their voices. Just be sure their talent fee matches your budget.

iPhone video tips

If you have an iphone (or any smartphone, for that matter),  you’ve got everything you need to make a great science video. Of course, if you want to make an amazing video you’re going to have to learn a few filmmaking techniques to make it shine. Start by watching this short video we put together that highlights four tricks that will help you become a better smartphone filmmaker!

IPhone Video Tip 1: Hold it steady

This is extremely important. The first of our iPhone video tips is to keep the phone as steady as possible. The iPhone can take lovely HD footage if it is perfectly still, but if you shake the sensor (move the phone) the image quality begins to degrade. Just as when you shoot with a professional video camera, a tripod will only help you!  For this shoot, I tried this tripod.

If you don’t have a tripod, one stabilization trick is resting the phone on a t-shirt or something soft while you hold it on a table top, the ground or any solid surface. Holding your breath during shots can also help minimize shakiness if you are hand-holding the phone on a solid surface. If you can prop it on a surface without holding it (I’m fond of using two bean bags to hold it at the right angle), that’s even better.

IPhone-video-tripod

IPhone Video Tip 2: Use Good Light

If you can’t get good studio lights, one simple solution is to go outside! Smartphones can take amazing photos and video, but the the light needs to be fairly bright. We’ve all seen grainy photos and videos from well-meaning folks, so just keep in mind the lighting in most houses alone is not bright enough for crisp photos and video. If you’re filming indoors, light it up as much as possible – with bulbs or even just filming near a sunny window.

Iphone video tips - good light

IPhone Video Tip 3: Focus on Sound

The best way to get good sound is to use a quality microphone that’s close to your mouth. There are a few good microphones for the iPhone. The two that I’m a big fan of are the Rode SmartLav and the Rode iXY. If I were to consider any of these iPhone video tips the most important, it would be this one. Without good sound, the video is going to feel more amateur.

iphone-video tips - good microphones

IPhone Video Tip 4: Use some lenses

Mix it up. Try a few specialty lenses. They may not be the best thing in the world, but they’re fun to try to mix up you shots. For this shoot, I used a 60x microscope lens, a telephoto lens, and a wide angle lens kit. Overall, they’re cheap and kinda fun to play with. However, I should note that the BEST lens is the one that is on the camera. These cheap lenses do act to degrade the quality of the image a bit, as you can probably see from the video we took.

If you don’t want to purchase lenses, you can still set up interesting shots. Variety is the spice of life AND filmmaking. Try shooting from the ground, from up high, from the side, from inside things – lots of angles! The camera may be small, but you can still be very dynamic with the way you shoot and tell your story.

iphone lenses - microscope, telephoto and wide

Some Extra iPhone Video tips

  1. Use the tap to focus feature: the iPhone does a great job of focusing on near or far objects. Make sure you’re focusing on the right one.
  2. Don’t shoot vertical video: Don’t hold it up and down. If you’re not convinced, you need to watch this (hilarious) Vertical Video PSA.
  3. Get B-roll: If you’re going to edit it later, get a diversity of shots. Close ups, wides, the works.
  4. Get Close: The bigger your subject in the shot the better. Most iphone videos are seen on tiny screens. To get the detail you have to get close.
  5. Learn proper Framing: This goes for all filmmaking. Know what the rule of thirds are? If not, check out this link.

Ok I hope these iPhone video tips help you make some great videos to share with others. Leave me any comments if you have other tips or suggestions.

We have a new book – Making Science Films!

Amazon link to how to make wildlife films

Grizzly Man by Werner Herzog

The screen is black; all you can hear are the screams of two people coming from the speakers.  Your imagination runs wild as you hear two people fighting for their lives.  One yells to hit the ‘bear’. Suddenly you realize that this is the sound of two people encountering death from a grizzly.  The scene doesn’t just last a few seconds; instead, it lasts several minutes.  Its clear that the death was horrific, but then again, we see scenes like this all the time on the big screen.  After watching the action filled movie what are we left with?  These scenes never happened, but they could have.  In the movie “Grizzly man”, Werner Herzog made a film about the life and death of Timothy Treadwell, in which he had audio recordings that could hypothetically have been used in the film.  While it would seem like a filmmaker’s dream to have dramatic audio like this, he did not use it.  I would like to argue that Herzog intentionally kept these sequences out of the film, and in thus doing, made the incident and the film, more dramatic.

Television and the big screen have a tendency to show horrific events, whether true or not, on a regular basis.  Very few Hollywood movies can escape from showing people dying in dramatic ways.  It seems that our culture has become immune to these dramas that occur on the big screen. If Herzog allowed the audio of Timothy’s death to play in his film, would people have forgotten how terrible the episode was?  It’s likely that by letting people hear the audio, it would have trivialized it to the point that it didn’t seem as relevant, simply because it was on the big screen.  If you heard the tape as Herzog or the coroner did, the event would surely seem more real, and thus, the maximum effect attained.

Then again, playing the audio could easily have had the opposite effect, whereby it was so horrific that the audience would miss the message of the documentary, (that being the audience members feeling slightly sorry for Treadwell and ultimately understanding his cause).  Take for example the “Faces of Death” videos that started to come out in 1978 and had at least 4 different episodes through the 80s.  These videos show, almost entirely, real people dying.  By the end the effect seems a repulsion of the audience.  These films are so graphic that all one takes away from the film is (a) a more hardened stomach and (b) the belief that humanity is cruel.  Would Herzog have wanted audience members to leave the film with the sole idea that bears are cruel?  Herzog had the belief that nature was more raw and cruel than Treadwell portrayed it, but he includes enough of Timothy’s psychology to make it clear that he wants us to feel sympathy for Treadwell.  In the end, Herzog didn’t really want us to dislike Treadwell solely because he brought another individual into his seemingly crazy living habitations with the bears.

To get around using the audio in the film, Herzog uses a few separate scenes that graphically depict his death.  The first was the coroner describing the death from what he heard.  One learns what was said, and how long the actual tape was.  Because the coroner was describing the death with a dead body in front of him and the fact that he talks specifically about the parts of Treadwell that he found, the images that I imagine are greatly exaggerated.  Yet, the coroner was only part of Herzog’s devices used to describe the audio without showing it.

Herzog proceeds to show himself in the film listening to the audio directly from Treadwell’s camera.  Not only does Herzog listen to the footage, but also describes what he is hearing for the audience while talking directly to Timothy’s friend, Jewels.  In the film, Herzog tells Jewels that she must never listen to the footage, at which point she breaks down in tears.  Listening to Herzog describe the events of audio recording make my mind wonder and I imagine the worst.  It seems pretty obvious that Herzog had intended to do this before listening to the tape, simply because he recorded himself doing it.  Yet, after a personal conversation I had with Jewels later, she informed me that Herzog was deeply moved and troubled by the audio recording.  She said he was shaking and did no more filming that day.  She told me that he had to sit down later and drink several glasses of hard liquor.  This combined with the fact that I still have not heard the audio, make the incident seem more mysterious and dramatic.

Throughout the film the audience in some way expects to hear the audio that we know was recorded.  From the beginning of the film, Herzog makes it clear the audio exists.  Yet, by not showing it, the audience leaves the film still thinking about what could have happened.  In the end, this has a much greater effect on the audience than the real footage could have, and thus, Herzog, the master filmmaker that he is, gets the maximum audience effect.

Works Cited

  • “Faces of Death” – 1978 VHS, MPI
    home Video

Color Correction

Color correction or color grading is the art of manipulating the hue, satuation, luminance, gamma and brightness of the colors in your video. It’s just as much of an art as is the entire process of editing. Changing the colors slightly can do wonders to the mood of a film. While most shows on television have had professional color graders working on their pieces, you can do a decent job on it yourself.

For filmmakers who havn’t spent much time in a post-production facility, they might not realize quite how big of a difference color correction can make to a film. We were given a tour of the post-labs at the BBC a few years back. They showed us some of the before and after footage from a recent color grading test. The difference was absolutely amazing. The final piece was rich with color; it had an intense magenta sunset, and rich green grass in the foreground. A dark black silohette of a giraffe then walked through the picture. It was an amazin shot. Then they showed us the “before” video. What a disapointment it was to see what the footage really looked like. It looked like anything we could have shot on our small cameras. Plus, everything seemed a bit washed out. Not only were the colors not rich, but they weren’t even the same colors. The suset was orange and the grass more of a yellow-green. What an amazing learning experience that was.

Looking back on our experience at the BBC, I’m happy to say that it only encourages us. After we learned a thing or two about color correction, we realized that anyone can take their footage and make it look several steps more professional, just by color correcting the footage. While you could probably read books on the subject, the basics are really quite easy to master.

The first bit of color correction that you’re likely to attempt comes in as you’re editing your rough cut. Occasionally there are video clips that just don’t seem to fit well into the sequence. There might be an issue with the white balance; they are either too blue or too orange. Taking a second to fix this with a warming or cooling filter will help it match the sequence you’re putting together. Don’t spend a lot of time on it at this stage though, because it’s only after the final version of your film has been approved for content that you’ll go back and correct every shot’s color.

Professional color correctors may end up using some of the same programs that evrey video editor has in their tool-kit. Now that Final Cut has released Color as part of their editing package, professional color correction is affordable for most filmmakers. However advanced these programs might be, there really are only a few things you’ll have to worry about as an amateur color grader.

The first step in color grading is adjusting the hue. We recommend using a simple three-wheel color correction tool. This allows you to change the hue of the highlights, midtones and shadows in three seperate color wheels. There will also be an eye-dropper tool that will allow you to let the computer figure out the best color correction for the shot. All you have to do is pick an area that is supposed to be white and an area that is supposed to be black and the computer does the rest. If you want the scene to look like it’s lit with moonlight, drag towards the blue end of the color wheel. If you want to warm up the scene, drag towards the orange end.

The next step is adjusting the luminance. In essence, you’re adjusting the brightness and contrast here. You can brighten the image a bit by sliding the cursors up in the highlights. You can also give the image more contrast by sliding it down in the shadows. Experiment as needed.

Finally, you can play with the saturation. Most of the time you should only tap it slightly one way or the other. Images that are overly satuarated don’t make the overal image look any more appealing.

Remember, everything you’re doing in color correction should be for a reason.

Video Tutorials on Color Correction

Sound Mastering

The audio for your video can make or break the entire thing. In wildlife and science documentaries you have significant portions of the film that need to be created in post. For example, if you’re shooting a hawk with a telephoto lens, it’s almost imposible to record the flapping of their wings as they take off while you’re shooting. Instead, you’ll have to go back and create a foley track, a track that simulates the sounds of the bird flying. You might elect to use sounds of another bird flying or you might elect to record the audio on an umbrella opening and closing. We’ll save discussions on the ethics of both methods for later, but realize that much of the audio is created after the production phase.

For existing audio, you’ll have to sweeten it. Even though we explained in the production article on audio that there is no easy button to fix bad audio, there are many ways to make the existing audio sound better. In fact, there are certain audio sweetening techniques that every filmmaker should do to a final audio mix. These include the following:

  • Normalize the Audio
  • Remove White Noise
  • Remove Pops and Clips
  • Use Cut-off Filters and Compression to decrease the range
  • Equalize Audio Tracks
  • Add Audio Effects and Foley

Before we begin, we should emphasize how important it is to have a good set of studio monitoring speakers. Editing with headphones is a bad idea simply because they tend to skew the final audio a bit. They’re very good to have, but when you’re doing final mixing you need to have external speakers.

Now, we’ll take you through each part of the audio sweetening process so that you understand the basics.

Normalize the Audio

When you record audio from interviews or live action, most of it will be recorded below the optimal level for playback. This is done to prevent peaking and cropping of the sound clips. At this stage though, you’ll want to normalize the signal, which increaseases the volume of the signal as much as possible so that the loudest areas just reach 0dB. It’s a pretty easy process. We like to use simple programs like levelator, but you can do it yourself in most audio programs. Simply tell the software to normalize, and the computer does the rest.

Remove White Noise

When you recorded the audio in any location, you should have spent some time getting the background white noise. This is when you recorded the scene without anyone talking. Besides giving you some audio to cover up cuts, this also gives you a base to attempt to remove the noise. All you have to do is select the area of the audio that represents the white noise and then use the “set as noise floor” function. From here you’ll use a few other filters, such as the reduce noise filter and the noise threshold function. We won’t go into the details of how to do it here. You can research that in the particular program you’re using. Just know that this is good step to be aware of in the process.

Remove Pops and Clips

Clicks and pos occur in your audio when the sound peaks above the intended range. Often this is a result of not having a windscreen or pop-filter on your microphone. Lavalier microphones that rub against jacket zippers cause pops. Sometimes the audio just cracks and pops because of a faulty cord. Whatever the cause, you need to remove them. Most programs have an analysis too that allows you to see the pops and clicks. Most of the time you can

Use Cut-off Filters and Compression to decrease the range

Cut-off filters are used to remove high-pitched or low-pitched sounds from the audio track. If you’ve ever shot under a high voltage power line, you will know about these high-pitched sounds. While we can hear pitches up to about 20kHz, it’s often a good idea to take out anything over 16 or 17 kHz. This makes the overal audio quality pleasing to the ear.

Compression decreases what is known as the dynamic range of the audio track. When someone talks, they have loud sounds and quite sounds. By compressing the footage you decrease the decibel range between these two.

Equalize Audio Tracks

Audio tracks, particularly voices should be equalized. We find this is particularly useful for strong male voices. Generally you’re going to boost the mid-ranges, but the final effect is that it makes the audio really pop.