instagram video tips

Taking Your IG Science Videos to the Next Level

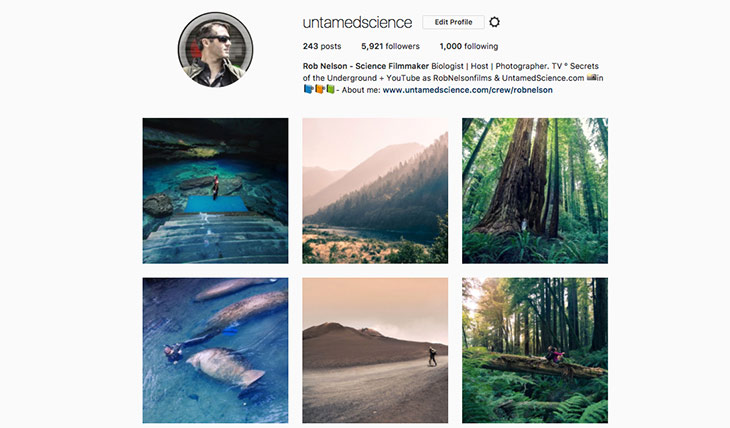
Let me be honest from the beginning. We all probably know that having followers and an audience on any platform gives you a voice. It gives you some degree of influence. It can leverage you a job. It can help you keep your job. It can help you get your message out there. But, I’m sure you already knew that. If you want to use social as a way to reach out, it’s good to keep that in mind. Instagram is a place to connect with and share your ideas with a large group of people and it’s perfect for scientists to reach the public. But, if you’re going to use it as an outreach platform and not just a place to post family photos and pictures of your last meal, you may as well use it well.

A Quick Background: Why I want more scientists to step up.

I’m a science filmmaker, a handy new title I added some ten years ago when all I could call myself was a scientist. I don’t like the title of TV host much either, as it implies that’s all I do. The truth is I’m in the game of educating the public about science. The networks have often been accused of taking a seedy route in their portrayal of science – something I commented on here. I think the only way to take the wheel back in favor of good science is for more of us to learn the trade. Everyone needs to learn how to tell good stories.

I use social media as a tool to tell stories about animal behavior, ecology, biology and the scientists that study the natural world. While I do have a long term Citizen-Science white squirrel research project, I have mostly skewed away from data collection to public education about science.

As I’ve progressed in this career of trying to tell better science stories, I’ve seen the need for some basic education of scientists. First, every researcher should know how important media is in this day and age. Whether or not they take advantage of it is their choice. Second, they should know the basic skills involved in doing that. I’m always surprised when they resist my media nudges and always encouraged when I see those smart ones use it to their advantage. I wrote this science filmmaking book so that I could direct people to extra reading material. For those that don’t like to read, here is my point in a snappy and video-friendly way.

I went on (with Jonas) to make an entire How-to-Make-Science-Films Youtube channel aimed at teaching scientists and educators how to get started with this toolset. As a shameless plug, I highly encourage a browse through those if you want to take your video to the next level. This crowd is exactly why I made them. But enough about my background. You get it. I love video. Let’s get to Instagram.

How Instagram Video is different

Instagram is hot right now, and a great platform to tell stories – both via pictures and videos. Making videos for Instagram specifically does have differences, but I don’t think it changes the filmmaking formula. First, you need to think about your audience. How will they see it and the message you want to deliver? After you’ve nailed those down, work backwards. With Instagram, these things stand out.
  • Your viewer is likely going to be on a phone
  • Your audience is generally younger (but getting older).
  • The attention span of a “swipping viewer” is short (so make it catchy)
  • You’ll need to think vertically if you’re going to mix the video into the “video stories.”

Recently Instagram has integrated video a lot more and while the platform still is mostly a picture sharing application, you’d be wise to start using the video features of Instagram if you want to set yourself one step above the rest. And let’s face it, that’s the point if you’re going to get your message out. You want to stand out as someone that has something interesting to share.

There are two forms of video you can add. You can add up to 60 seconds of video right into your feed, or you can use video in 10 second chunks in the story function of Instagram. Those stories disappear in 24 hours, so it encourages things that are easy for people to produce and give that wonderful, “behind-the-scenes” feel. I’m going to talk specifically about the videos in the story feature.

How to Make these Instagram Stories with Video

Lately I’ve been putting together fun Instagram stories that combine a lot of video into the mix. They also tell a nice story. I captured a story I made last week and put them side by side into this GIF

I tried to tell a simple story instead of just mixing in random clips. The real magic though happens after I think about the story and start mixing them together in my editing programs. I made this video specifically to show you how to do that.

But to start, you can begin telling your Instagram stories without editing them at all. Tell your larger story in small 10 second chunks and piece it together at night, after your field sessions. The key is that you start trying to think of these stories as a tool to tell others about your research. While shooting those random shots of your research is fine, if you want to take it to the next level, you’d be wise to start improving your video with some of these tips.

I hope that helped. If you make a fun video story on Instagram, tag Jonas (@behindthescience) and I (@untamedscience) in the post. That way we can see it and follow your work! We’re always excited to work with others that like to communicate science.
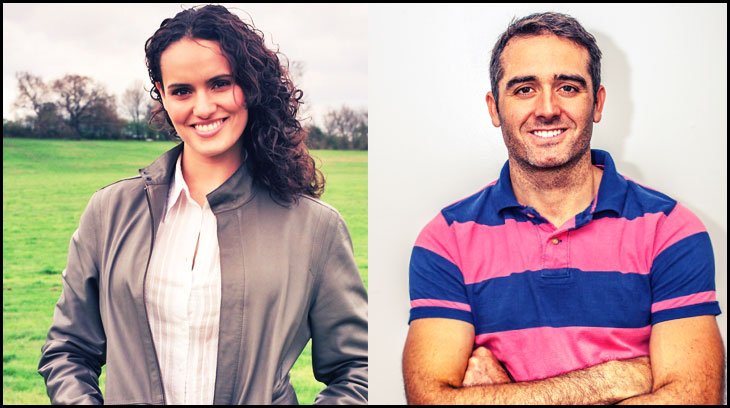
Rob is a cofounder of UntamedScience.com and author of “how to make science films.” He teachers courses for science filmmakers and has hundreds of videos on their “how-to-filmmaking youtube channel. Check them out and don’t be shy to reach out to them and say hi.

Documentary Costs

One of the first things you need to figure out when planning a film, is the cost. How much are you going to have to shell out to make your film. To help us explain this, we made a few videos on the topic.

Explaining the Cost of Docs to Clients

A Range of Video Costs

For perspective I outlined the cost of a few different videos.

  • BBC Planet Earth: 2.2 million dollars an episode. Close to 40K a finished minute.
  • American Grit: 2 million an episode
  • Biggest Looser: 1 million an episode
  • Most Nat Geo or Discovery shows: 400K-ish
  • Clip Shows like What on Earth: Probably 100K or less

The Cost of Crew

Essentially, the cost of your production comes down to how much it’s going to cost to hire a crew. Here are some standard ranges for crew of unscripted documentary work (although they vary depending on where you are – LA? – DC?)

  • Camera Operators: 400-650/day
  • DP: 650-800/day
  • Sound: 400-650/day
  • Editors: 1750-4250/week
  • Story Producers: 1650 – 3K/week
  • Senior Producers: 1750-2500/week

The last and final step is creating a budget. Jonas and I plan to do a video for that in future episodes. However, this is the best Documentary Budget Sample Sheet I’ve found online. It should give you a good overview until we make that next video.

Managing Fluorescent Flicker

If you’ve shot indoors with fluorescent lights, you’ve probably experienced the dreaded flickering. It makes your video look terrible and will cause your editor endless headaches to make it look better.

Fortunately, we’re here to help you find a way around it. In this week’s video tip, Jonas explains how to get around it and make your video look great!

The problem

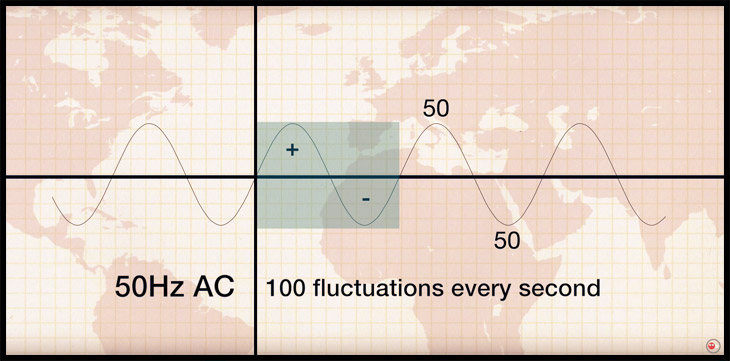
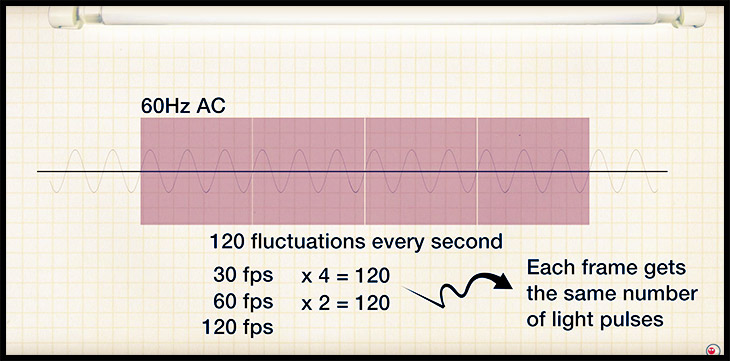
Essentially the problem has everything to do with understanding how fluorescent lights work. They’re not “on” all the time. Instead they flicker on and off at a certain frequency. They do this so fast that our eyes can’t sense it. This is what the fluctuations of a 50Hz AC fluorescent light looks like.

fluorescent light chart

Who uses what frequency?

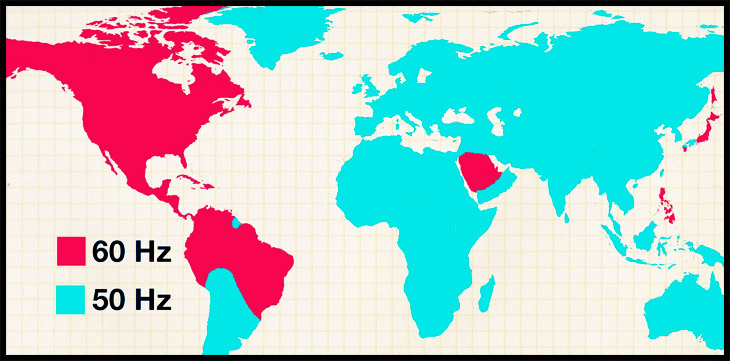
We’ll discuss how to get around this frequency. However, as we go through, understand that the frequency of AC currents differs depending where you are. In much of North and South America it’s 60 Hz and in Europe, Africa and Asia, it’s 50Hz. Refer to this map for a general overview.

fluorescent light chart

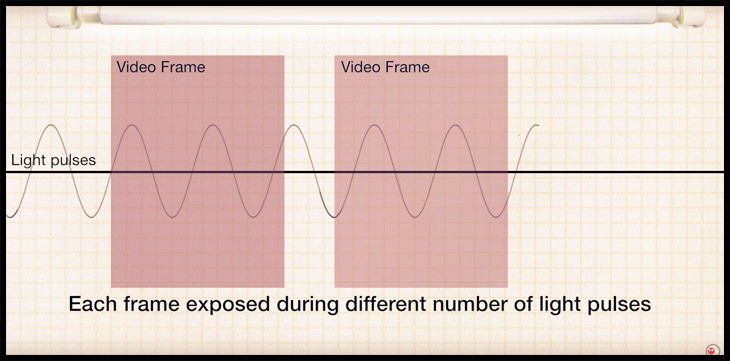
If you set your camera up to capture a still frame at a certain frequency, it may mess you up. Here’s why. If you’re always capturing an image at the top of the curve (for example), you’re fine. However, if you start capturing video frames when the fluorescent light is putting out different intensities of light, you’ll run into trouble.

fluorescent light chart

The Solution

To get around this problem you have to match your frame rate with the frequency of the lights you are in. You need to shoot at frame rates that are divisible by the number of light pulses. So, in a 60 Hz AC area, you’ll need to shoot at 30, 60 or 120 fps.

fluorescent light chart

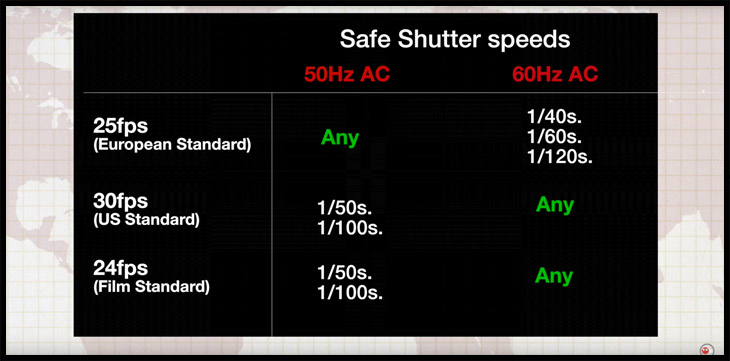
However, If your camera is set up for European PAL shooting, you may not be able to get these frame rates. You can get around it by simply shooting at different shutter speeds. Here is a chart to help you understand the best ones.

fluorescent light chart

Good luck shooting in fluorescent lights! We made this video as part of our Youtube Channel, Rob and Jonas’ Filmmaking Tips. It’s really fun to share these tips with you. Here is an intro to why we think video is such an important tool for everyone to learn.

Life After: Chernobyl

There is a new show on Animal Planet, and I happen to be cohosting it. I had the pleasure of going to Chernobyl last year with Anthropologist Mary Ann Ochota. Animal Planet released their first press release about the show a month before the 30 year anniversary of the Chernobyl explosion. Here is a snippet:

LIFE AFTER: CHERNOBYL – 30 years after the worst nuclear catastrophe in history, which sent a plume of highly radioactive fallout into the atmosphere, biologist Rob Nelson and anthropologist Mary-Ann Ochota are the first scientists granted unlimited access to all areas surrounding the infamous Chernobyl Nuclear Power Plant. Knowingly putting themselves at risk to radiation exposure, the duo investigates the effects of high radiation doses on the surrounding animal population and how wildlife and environment have been affected after decades as one of the most contaminated place on earth.

life-after-chernobyl-mary-ann-ochata

Premiered on the 30 year anniversary

It aired at 10 EST, April 26th. Set your DVRs.

I must say, I am very excited about the release of this show. In the last year, Discovery Networks has had a lot of bad press for over-sensationalizing science documentaries. They have said they’re turning the corner now and producing a whole series of high-end blue chip animal docs. Leading the way is this new series. I can’t be prouder of the show that was shot with an amazing team of filmmakers. I think it does a great job telling the story of the drama that just fills the air when you enter this post-apocalyptic landscape, while also telling the interesting stories of the science behind the animals and plants here.

I hope what we did will open your eyes to nuclear fallout, and to what life is like after the Chernobyl incident.

Camera bag

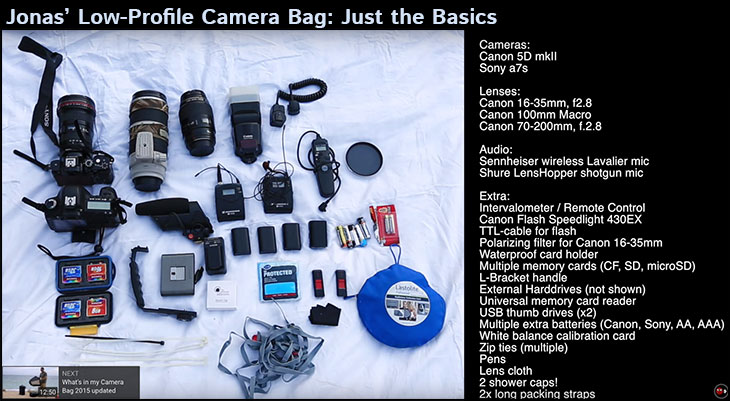
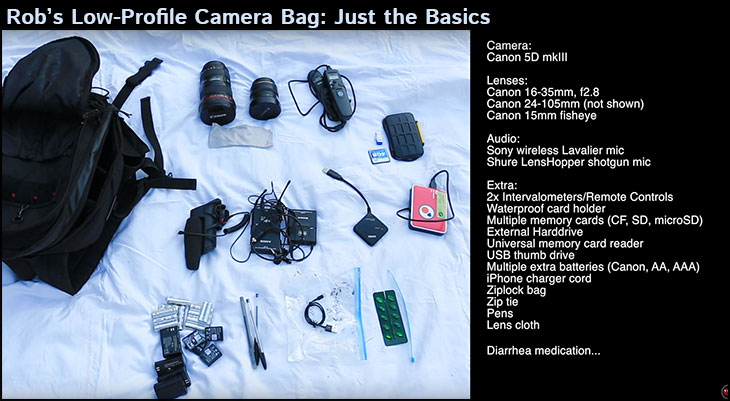
The contents of your camera bag should help you get the best shots while you’re in the field. Carry too large of a bag and it may hinder your shooting. If your bag is too small, you are limited to certain shots and perspectives. In this video we wanted to share what we bring with us every time we’re out the field. This is our bare-bones bag. Clearly we’ll bring more with us in extreme backwoods shoots or specialty shoots, but we never leave without these things.

The Bags in DetailCamera Bag Contents Camera Bag Contents Rob Nelson

Get Items for Your Bag

We created a short list of important items for your bags that you can get on Amazon. We are not supported by any of these companies but we did put in referral links to Amazon. That means you can actually help us create more content simply by purchasing your camera items through these links.

Cameras:

Canon 5D MIII:
Canon 5D MII:
Sony A7s:

Lenses:

Canon 24-105 L lens:
Canon 15mm fisheye:
Canon 100mm Macro:
Canon 70-200:
Canon 16-35 L lens:

Camera Bag:

Rob’s Bag:
Jonas’ Bag:

Audio Gear:

Shure Lenshopper:
Sony Lav Set:
Sennheiser Lavs:

Cards:

SD cards:
Waterproof case:
mini SD cards:
compact flash cards:

Extras:

Robs USB 3.0 transfer card:
Cheap extra camera batteries:
Metabones adaptor:
white/grey card:
Diarrhea pills (for 10 bucks, just add these to your cart):

What’s in your Bag Part 2: Adventure Gear

Here is an updated version of the above video.

How to make hand-drawn style animations

If you’ve watched Untamed Science videos lately, you’ll have noticed that we’ve been doing a lot of hand-drawn, sketch-style animations. These animations can be done in a few different ways, but I’m going to show you what I think is by far, the easiest.

untamed animated gif

Hand-drawn Animations – Background

Animations in the past were created with anywhere from 8 to 12 drawn animations per second. That means that if you’re rending out a 24 frame per second movie, then each drawing is on screen for 2 or 3 frames. In today’s digital world we can simulate that effect in three different ways.

  1. Create 3 different images in photoshop and cycle them so that they are on screen for roughly .2 of a second. At 24fps, I find that each image should stay on for 5 frames.
  2. Create one image and use Effects>Turbulent Displace in AE to simulate the hand drawn effect
  3. Screen capture your hand drawing and add a type sketch filter in your editing program (such as in FCPX)

I’ll show you all three as we go through this tutorial

Video Tutorial – Hand Drawn / sketchy style animations

How to Get Started in Hand Drawn Animations

If you have never done hand drawn animations, it really is super easy. I did the whole process in this short tutorial.

The main things you’ll need here are:

  • A screen capture software such as Camtasia.
  • A drawing application such as Photoshop.
  • A tablet to draw with such as the Wacom tablets.
  • An editing program to put it all together in, such as FCPX.

DIY Gimbal Phantom 3

drone-2

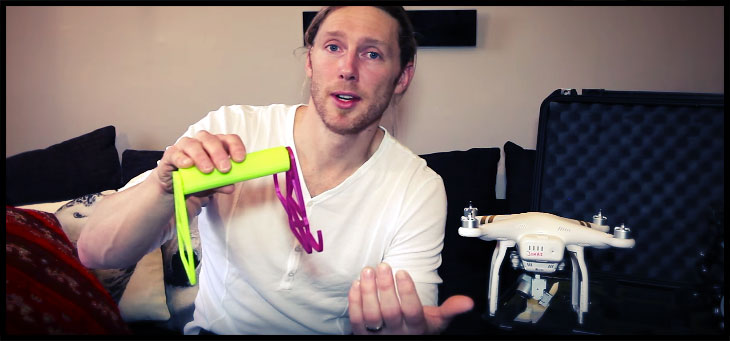
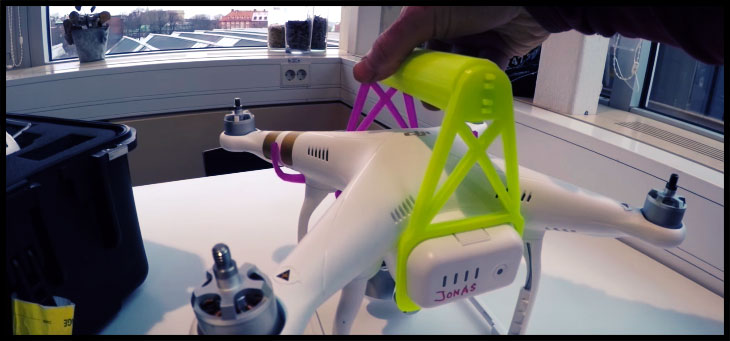
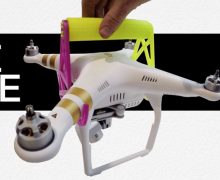
No need to get a handheld gimbal if you have a drone! In this weekly video Jonas gives us a walkthrough to a pretty cool technique whereby you can make a handle for the DJI Phantom 3.

This video is made for those times when you wish you could make use of the sweet stabilized video you get from shooting with the phantom drones but conditions just make it dangerous to fly. This video will help you in some of those cases. No matter if you are shooting indoors or in a dense forest, this handle really helps keep the drone gliding smoother than just hand-holding it. You just have to find someone with a 3D printer…

dron-handle-3

Link to the 3D design

360-Degree Video Guide

From our perspective, VR (virtual reality) is the next unrefined technology with the potential to change the world. Here is a quick 2 minute sample video we shot to demonstrate.

So what is VR? In simple terms, it’s the act of using a combination of computing power and optics to simulate a visual and auditory experience that seeks to fool the user into believing they’re someplace else.

But most people have never experienced VR. Those that think they have may have put on a Google Cardboard headset and called it VR. By our definition, it qualifies, but it’s very basic. It doesn’t offer the user the amazing potential of virtual reality and frankly, could put off potential adopters who experience nausea after a minute or two.

We’re convinced that this new technology is a game changer. The world of VR is ever-changing, and 2016 is set to be the year of VR. If you want to get a grasp on how to start watching VR content, then I suggest this great “Basic Guide to Virtual Reality in 2016.” If you’re ready to produce content, then check out our basics video right here.

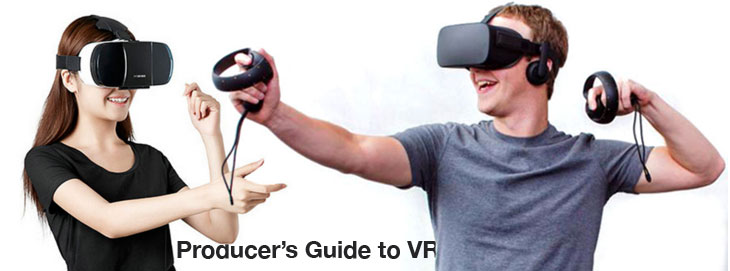
Producer’s Guide to 360° Videos

This article is intended for creators who are seeking to produce content. We spent the last week trying to figure it out, and we’re here to tell you that it’s completely doable in this day and age by the average production company. It does significantly increase the workflow and cost of a production, but it’s not an impossible task. Here is what we’ll cover to give you a basic understanding of the medium:


360 degree/VR Cameras and Rigs

The first thing you’re going to have to do is get a rig that will allow you to shoot in 360 degrees.

Stand-Alone Cameras

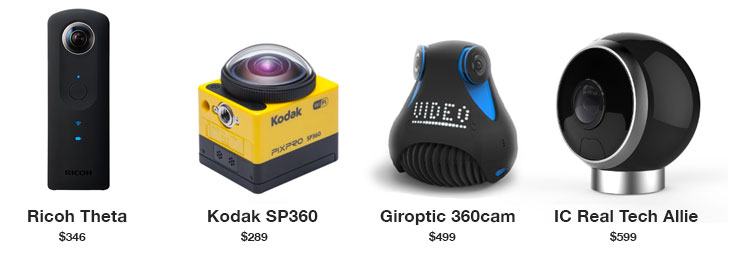
There are a handful of cameras out there that shoot 360-degree video in a single device. These include the Ricoh ThetaKodak SP360Giroptic 360cam, and IC Real Tech Allie. The prices for these range from 289 to 600 USD. The footage coming from them isn’t going to be the same quality as a series of 15 GoPro cameras, but it’s not bad for such a low price point.

360-cams 2016

Rigs for GoPros

The best entry-level technique we’ve found to shoot 360-degree video that could be streamed in VR with amazing results is taking a minimum of 5 or 6 GoPros and mounting them together in a molded rig such as the 360Hero cases or the Freedom360 rigs. No matter what you do, the minimum investment here is close to 3050 USD (6 GoPros + 500 360Hero Rig as seen below).

360-Video-gopros-jonas-stenstrom

360-degree/VR Editing Programs

The easiest program — and probably most used today — is AutoPano Video Pro (750 USD). This program comes with the stitching, syncing, and stabilization software you need to make 360-degree videos. This is the basic software you’ll need to make a single clip from your multiple cameras. However, if you’re going to add text to it, or edit up multiple pieces into a longer video, you’ll need to bring them into an editing program.

Adding Text and Graphics Using AE

To add text and graphics, the easiest method we’ve found is to download the 100 USD plugin – Skybox by Mettle. You’ll also need to have AE Creative Cloud to make this work. With this plugin, you’ll be able to add text, graphics, and get really creative. Here is a quick tutorial showing the basic process.

Editing 360° Video in FCPX

If you’re editing video in FCPX, you can edit the exported .mp4 videos that you get from AutoPano Video Pro into a sequence. The videos will have this odd look to them…

360-output

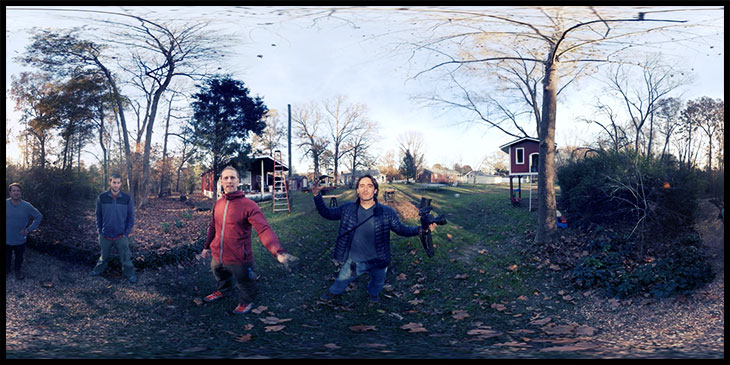
Essentially this is a 360-degree view of the world, whereby the top and bottom are stretched out. We’re all accustomed to looking at footage like this, though, if you consider how a map of the Earth looks with the poles stretched out in a similar way.

Just edit this stretched video into a sequence and then export as an mp4 file (export as h264 – then change the extension to .mp4).

Editing 360° Video in Premiere

The process works exactly the same as in FCPX. You can edit the footage in this stretched form. One nice feature in Premiere, is the ability to edit with an Oculus Rift headset on. If you’re prone to motion sickness, you may not want to edit long hours like this, but it’s a nice way to have a “director’s” view of what the end product will look like.

Uploading 360° Content to YouTube

To upload videos to YouTube, you have to follow their simple 360 video workflow. To make it simple, I outlined the process below. Essentially you have to download a small app and drop your video into it. This process changes some of the metadata, allowing YouTube to properly read the file as what it is: 360-degree video.

START by:

  1. Downloading the 360 Video Metadata app for Mac or Windows
  2. Un-zip the file, then open the 360 Video Metadata app. If you’re on a Mac, you may need to right-click the app and then click “Open”
  3. Select your video file
  4. Select the checkbox for “Spherical” and click “Save as”. Note: Do not select the 3D Top-bottom checkbox. For more information, refer to upload instructions for virtual reality videos.
  5. Enter a name for the file that will be created
  6. Save the file. A new file will be created automatically in the same location as the original file
  7. Upload the new file to YouTube
  8. Wait for the 360 degree effect to process. This may take up to an hour.

Watching 360° video with a VR headset

Now that you’ve finished your video, you’ll want to watch and share it with friends and clients. Here are some basic options.

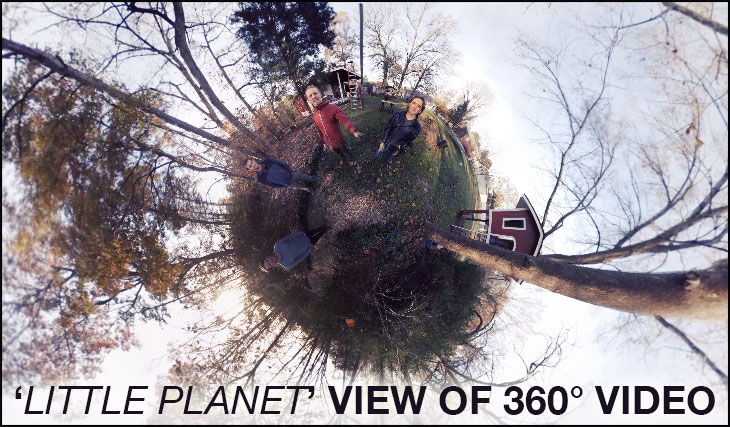
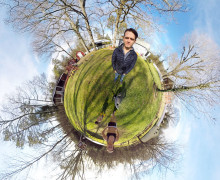
LITTLE-PLANET 360 DEGREE VIDEO TUTORIAL

Share It On YouTube

If you send a client video via YouTube, it’s likely all they’ll be able to do is scroll around it with a mouse (if seen from their computer) or wave their phone around to see the world you took video of. The second is my preferred method of sharing with clients. However, to get high-res video, you’re having to stream a 4K image. Most of the time the quality looks terrible. It’s a nice sneak peak, but most of the time this isn’t ideal.

If you have an android phone, you can take this one step further and watch it on YouTube via Google Cardboard.

Share it via Littlstar

Littlstar is an app you can download on your phone and play VR videos in much the same way as on YouTube. I’ve found the quality is a tad better (not much though) and it works with Google Cardboard on the iPhone. That’s a plus. However, it’s still not a great VR experience unless you’re using it with a dedicated VR headset like the GearVR or Oculus Rift (see below).

Use the GearVR with Samsung Phones

GearVR by Samsung is a 100 USD unit that allows Samsung phones to play VR content. It is a decent first VR experience for people. You can watch videos via Littlstar or any number of big providers. Hulu and Netflix are beginning to host VR content this year. It should be a game changer.

Using the New Oculus Headset

The best experience for your clients will be using a dedicated headset and computer system to share the high res (4K-6K) VR videos you produce in 60 fps. This is what the yet-to-be-released Oculus Rift aims to deliver. However, you’re going to need a dedicated Oculus-ready gaming machine to run it (another 1000 USD). Currently Apple doesn’t even produce a product with fast enough specs, so you’ll have to go the PC route.

360-guide video tutorial

Uses of 360° Video

It has been a long time since I’ve been this excited about a new way of making and sharing films. 360-degree video is something new and exciting. Before the novelty wears off, use it to attract viewers and get extra clicks from people amazed at the technology. Then experiment with it. Try new and different ways for marketing yourself or your products that not many other people are doing right this minute.

Other Resources for 360° Content Creators

Day-to-Night Time-lapse

The “Holy Grail” time-lapse technique describes the process of capturing day-to-night or night-to-day time-lapses. It has always been an extremely difficult technique because of the way the light gets brighter or darker as the sun rises or sets. To introduce you to the basics and walk you through the technique, here is what you need to think about.

In this video time-lapse tutorial, I attempted to walk you through the entire process from start to finish. Clearly, I missed a few things. But, I did include finding a location, setting the camera, and walking through the images in post production.

Day-Night Time-lapse Steps

Location

The following are my tips on finding a good location.
1. Contact the local film/photography club and ask for advice.
2. Drive around the city ahead of time.
3. Look for your location via Google Maps, either in the images search or with Google Earth.

Camera Settings:

There are two ways to shoot these sorts of time-lapses: aperture priority or manual adjustment. In both techniques I recommend leaving the white balance set to auto (although you can lock this as well). Make sure the keep the focus set to manual. In aperture priority mode, you simply let the camera adjust the shutter speed. However, the technique only works well when the sky is clear. Manual adjustment must be done in combination with a program like LRtimelapse

Post Processing the Time-lapse

Using LRTimelapse:

I just started using LRTimelapse and am really blown away by how it improves the workflow. I highly recommend it (and nobody told me to say that). I suggest watching this short explanation to give you a feel for what it can do. Then, go and download the trial version of LRTimelapse4. It gives you the ability to manipulate 400 picture sequences. That ends up being a 13 second time-lapse, so it’s a great tool to start with small time-lapses. Then, if you like it, you can buy the personal user edition for 100 bucks.

Lightroom to AE to your editing program

If you’re new to time-lapses, I have walked through the entire process from start to finish in this complete time-lapse tutorial.

I hope you enjoyed the tutorial. A few notes:
a. I did bump the tripod once so I suggest avoiding that.
b. I stopped the time-lapse half a dozen times to look at the images and accidentally took a few too many test shots in the middle. That made the clouds jump a bit. Avoiding that will make a smoother final product.

More Time-lapse Filmmaking Links:

  • We have a new science filmmaking book out that outlines everything you need to know to take great pictures and video. Buy it on Amazon.
  • Also, Jonas and I are creating a whole series to get you started. Here is the first video to get you into it.
  • There are relatively few places to get hands on tips in an amazing location. I recently found this time-lapse course in Moab. It’s a bit expensive, but I imagine it’s a great time!


5 Tips for Better Adventure Travel Photos

Here are 5 tips for beginners on getting the best adventure travel photos 

Traveling is never complete without taking photos of your memorable vacation. Even when smartphones were not as prevalent, portable film cameras were a companion for many travelers taking snaps of their moments, whether a photo of themselves with beautiful scenery in the background or just the great outdoors. But taking pictures may not be that easy for travelers who signed up for an adventure trip. Taking great photos can be nearly impossible when everything runs so fast. For beginners, here’s a helpful guide to producing the best photos of an adventurous vacation. And, just for fun, we’ve sprinkled in some short videos to help explain each point.

1. Apply the “Rule of Thirds”

Among the photography techniques you can use, the Rule of Thirds is most important and highly necessary for capturing great images. It will help create good and balanced composition of the subject and the background without placing the former in awkward places in the shot. According to Digital Photography School (DPS), the concept requires breaking the image into thirds horizontally and vertically to make nine parts or boxes. Place the subject on the intersecting lines/points (rather than in the center of the shot) to make it more natural-looking. “Using the rule of thirds works with this natural way of viewing an image rather than working against it,” notes DPS.

2. Use lighting the right way

Natural light is always the best option in terms of photography lighting, but it’s not always the best option available outdoors. Gloomy weather can get in the way, or too much light can destroy the subject’s shadow. You have to choose between giving more light to the background and darkening the subject, making it a silhouette, or lighting the subject and blurring the background. It helps to use a light meter in this case to understand each situation. No need to purchase an expensive light meter when you can install one yourself via your smartphone (an option that is often free). We suggest the Pocket Light Meter by Nuwaste Studios, an app that gives you more tools to adjust the aperture (speed of lens closure) and ISO (amount of light that pass through the lens).

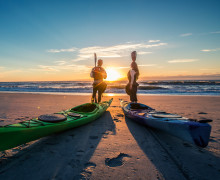
Rob Nelson and Haley Chamberlain on the beach with kayaks

3. Get action photos

Although it’s easier to shoot still subjects, more emotion and drama can be captured in action photos. This will require tweaking your camera tool to enable it to shoot moving photos clearly and avoiding blurry images. How? Select a fast shutter speed that will depend on how fast your subject is moving. Race cars will require 1/4000, while a jogger requires 1/250 shutter speed. If there’s not enough light to show the subject, tweak the ISO manually to widen it aperture to f2.8 or f4 to let more light in the lens. It also may require anticipating some movements and actions. As a photographer, you want to know when the subject will jump, move, or flip to capture that great action shot.

Wakeboarding composite image

4. Maximize editing software or apps

Although some raw photos might appear nearly perfect (good lighting, balanced composition, etc.), nothing beats adding some flair to the image via editing software or applications. Adobe Photoshop is perhaps one of the most popular editing software today, but it’s not necessarily beginner-friendly with its various buttons and tools. Some software, such as Picasa and Fotor, offers more approachable tools. Adobe’s app version, Photoshop Express, is more user-friendly and lite, which is ideal for smartphone users. Other smartphones like the newer iPhones (featured by O2) come pre-built with propriety editing software (iSight) that creates “Instagram-perfect” images via editing filters. In addition, these smartphone apps and features make it quicker to share edited photos on different social media platforms.

hiking to the lava - Rob Nelson

5. Learn slowly but surely

As a beginner, know that this is a learning process. The best way to learn how to take great images is by taking as many photographs as possible. Nothing can be taken in a single snap. Photographers may choose from more than 10 alternative images when deciding on the best one to use. In addition, there is no need to spend thousands on expensive tools and a camera. Start with a camera that is comfortable to use, whether a pocket digital camera or a smartphone. It pays off to also experiment with the settings of your camera to understand how each work and to read plenty of resources online.

What’s your favorite editing app on your smartphone? Share your travel photography stories with us.
Follow Untamed Science for more tips and stories from other travelers.

Written by Arisha Sylvie

Other Resources